> ## Documentation Index
> Fetch the complete documentation index at: https://www.mintlify.com/docs/llms.txt
> Use this file to discover all available pages before exploring further.
# API playground overview
> Let developers test API endpoints directly in your documentation with an interactive playground that sends real requests and shows responses.
The API playground is an interactive environment that lets users test and explore your API endpoints. Developers can craft API requests, submit them, and view responses without leaving your documentation.
See [Trigger an update](/api/update/trigger) for an example of the API playground in action.
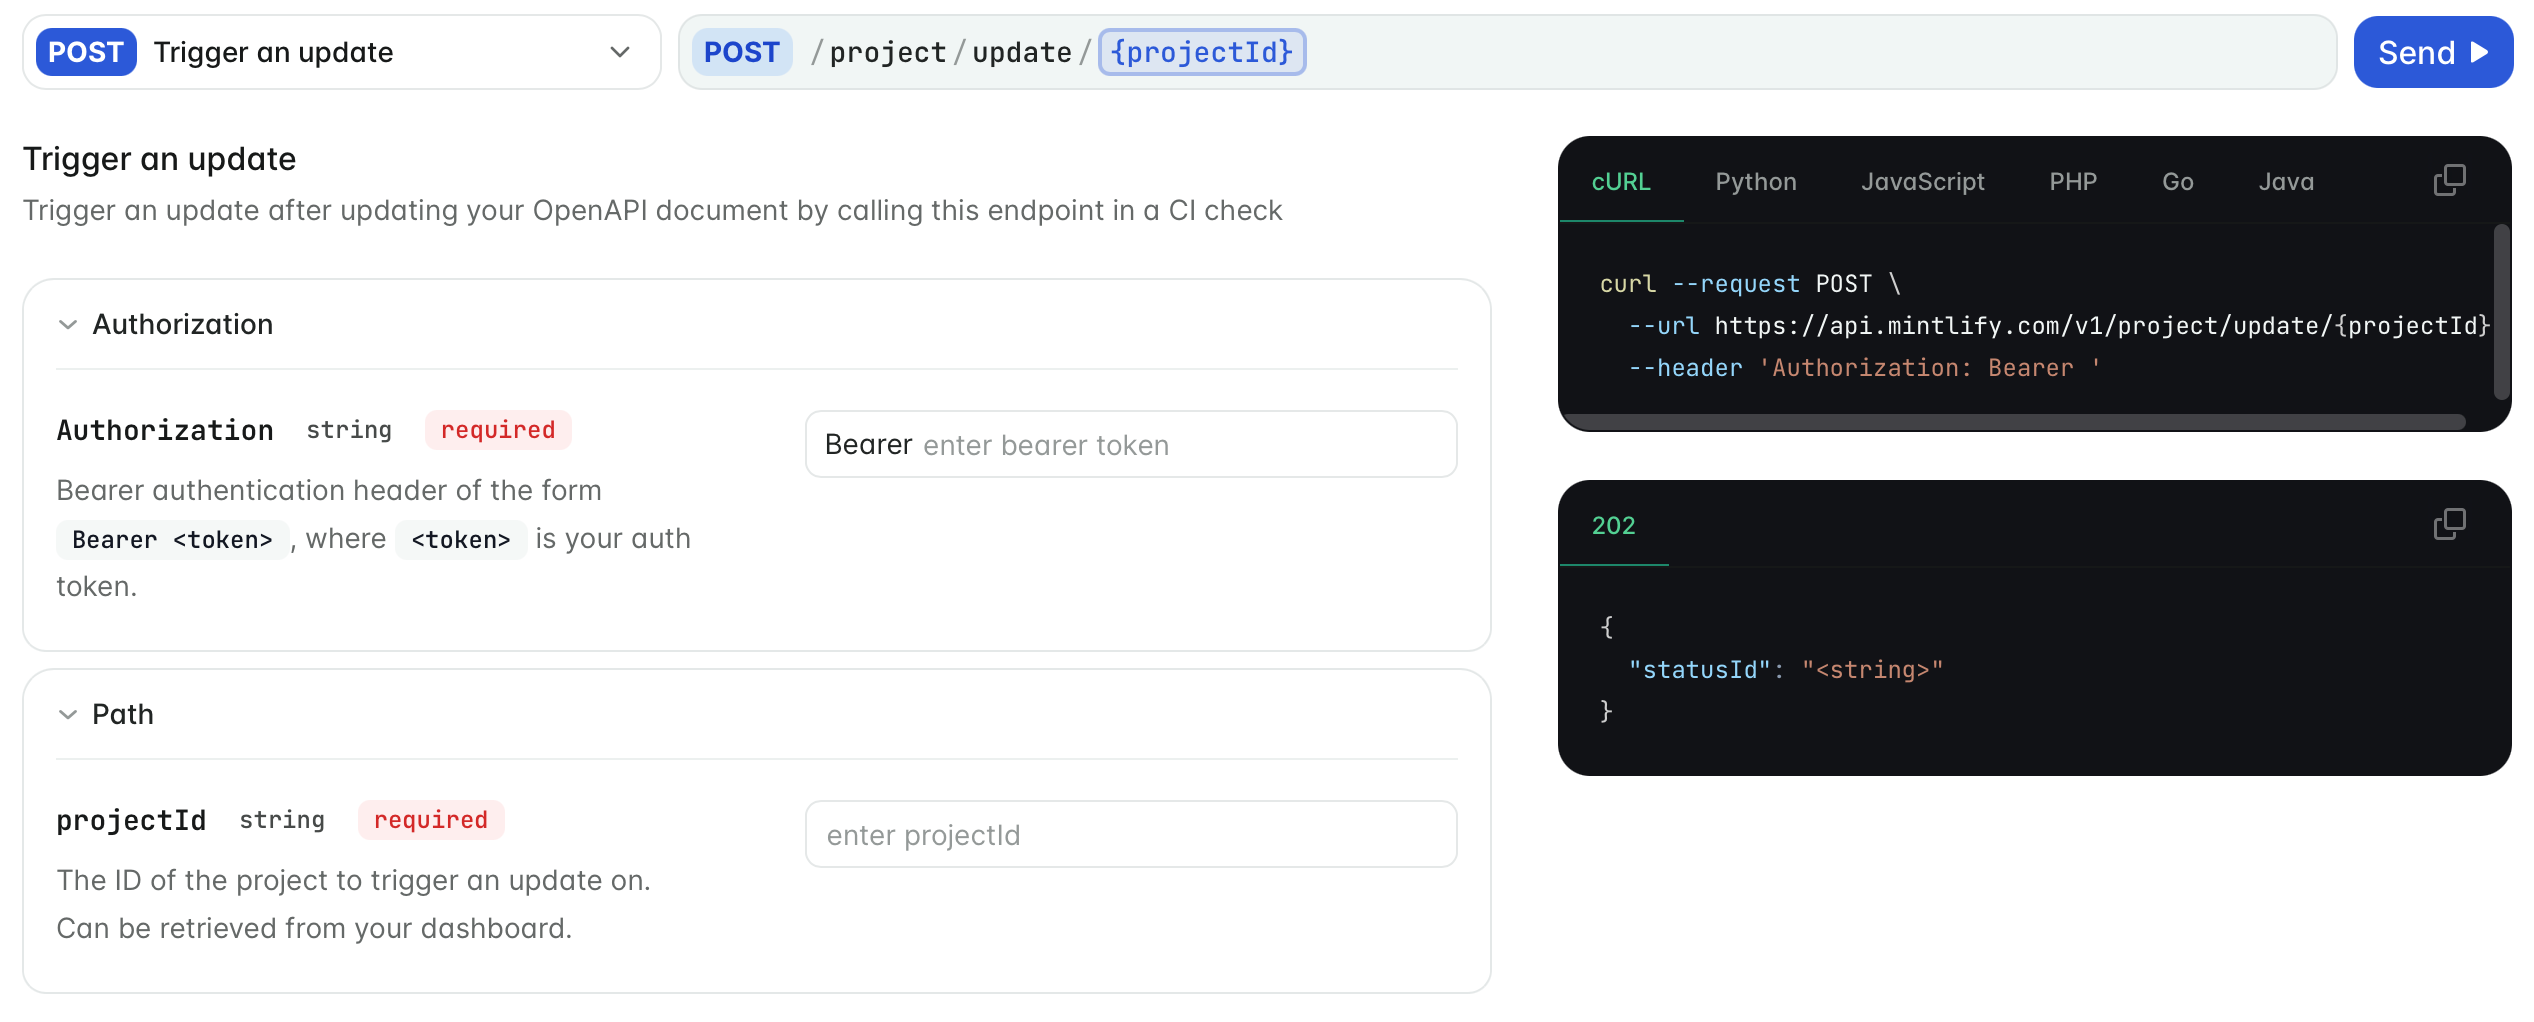
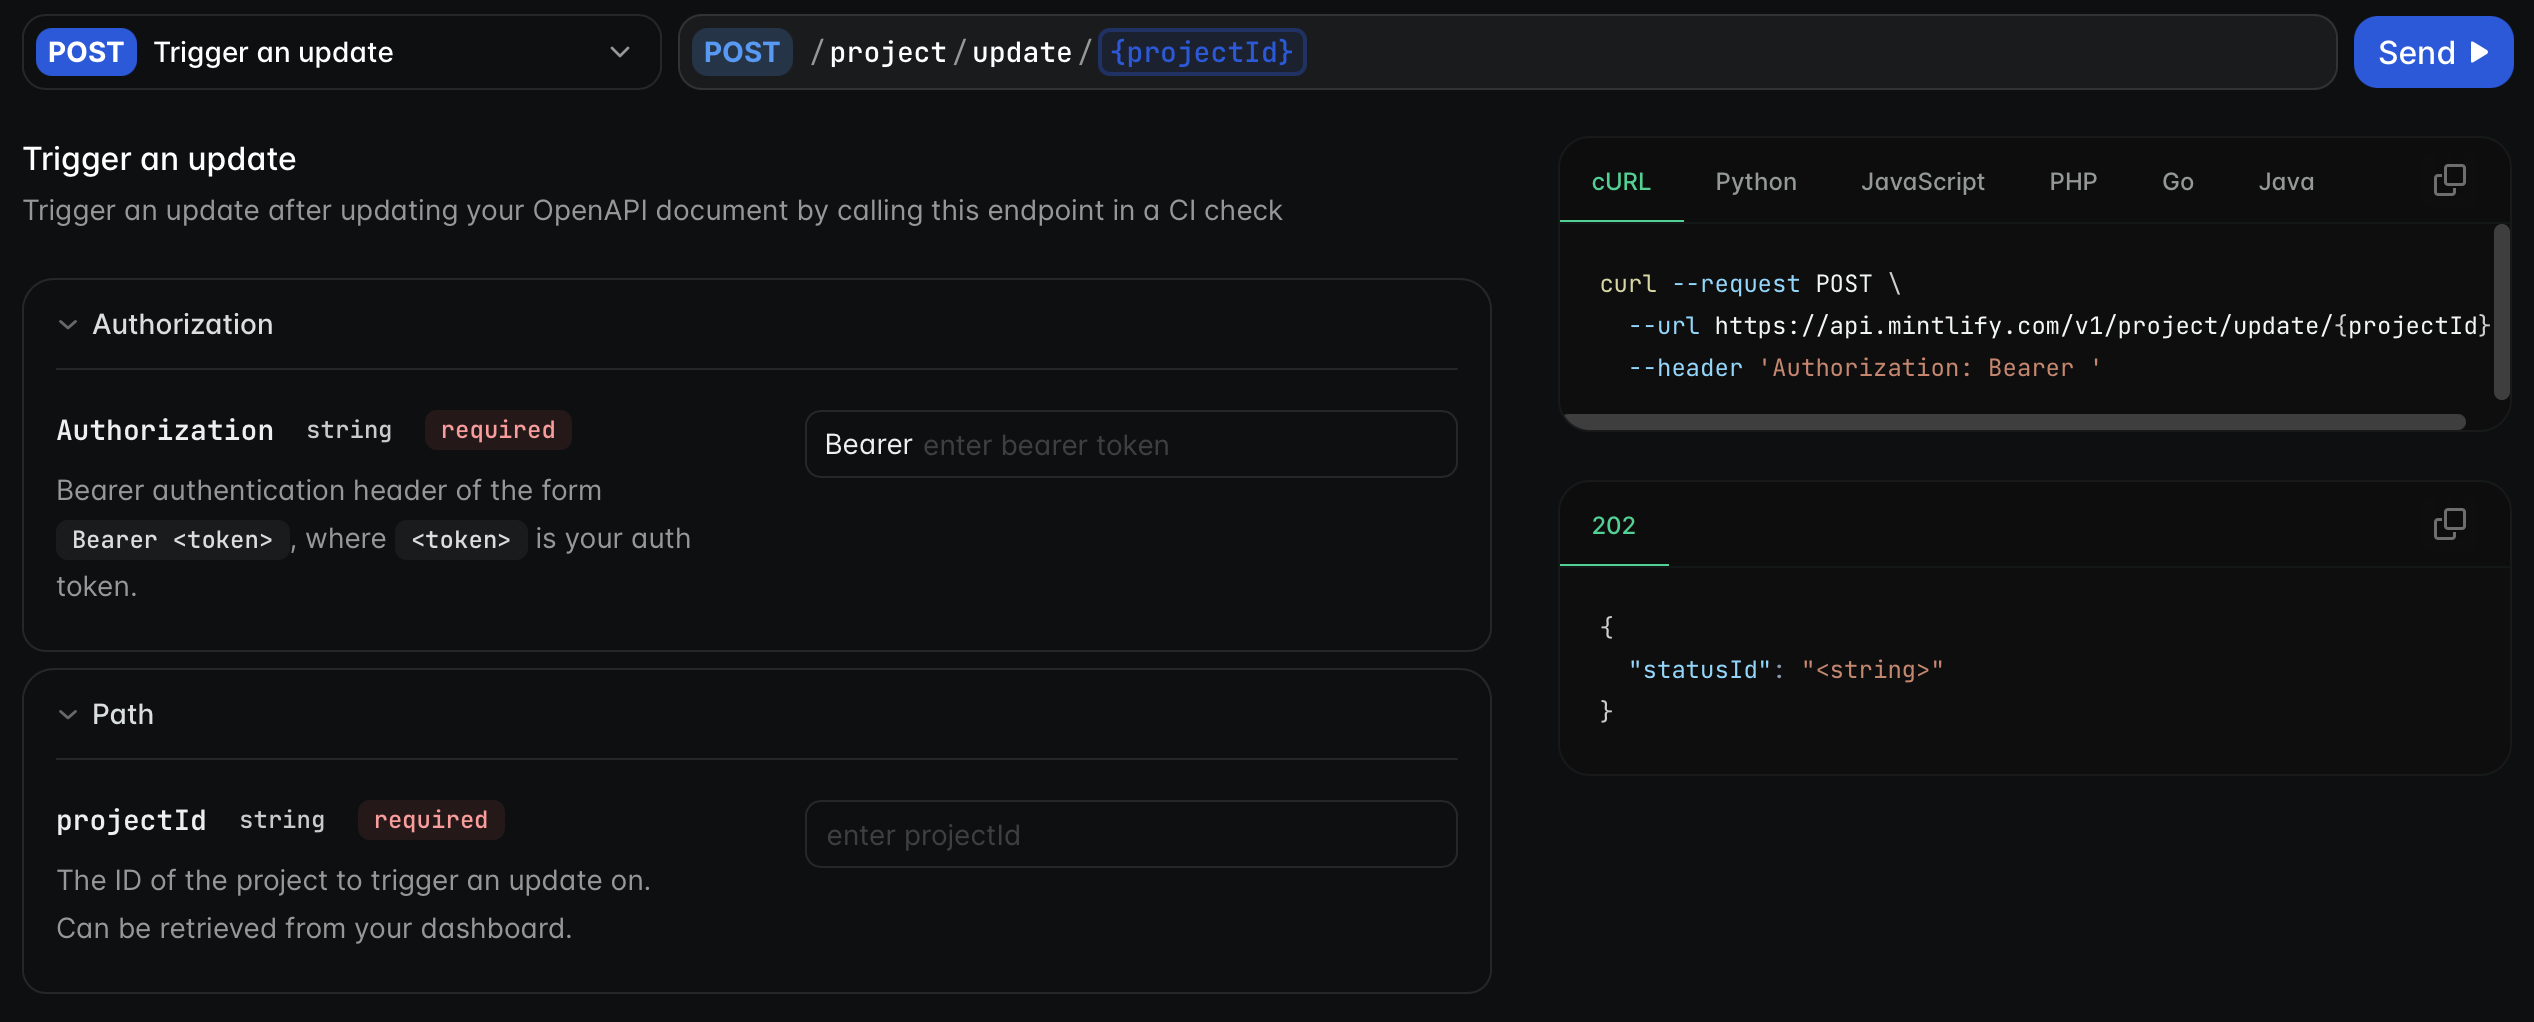 The playground generates interactive pages for your endpoints based on your OpenAPI specification or AsyncAPI schema. If you modify your API, the playground automatically updates the relevant pages.
Generate your API playground from an OpenAPI specification for the best results. You can also manually create API reference pages after defining a base URL and authentication method in your `docs.json`.
## Get started
Validate your OpenAPI specification file using the [Swagger Editor](https://editor.swagger.io/) or [Mint CLI](https://www.npmjs.com/package/mint) command `mint validate`.
```bash {3} theme={null}
/your-project
|- docs.json
|- openapi.json
```
Update your `docs.json` to reference your OpenAPI specification.
**To automatically generate pages for all endpoints in your OpenAPI specification**, add an `openapi` property to any navigation element.
This example generates a page for each endpoint specified in `openapi.json` and organizes the pages in the "API reference" group.
```json Generate all endpoint pages theme={null}
"navigation": {
"groups": [
{
"group": "API reference",
"openapi": "openapi.json"
}
]
}
```
**To generate pages for only specific endpoints**, list the endpoints in the `pages` property of the navigation element.
This example generates pages for only the `GET /users` and `POST /users` endpoints. To generate other endpoint pages, add additional endpoints to the `pages` array.
```json Generate specific endpoint pages theme={null}
"navigation": {
"groups": [
{
"group": "API reference",
"openapi": "openapi.json",
"pages": [
"GET /users",
"POST /users"
]
}
]
}
```
## Customize your playground
Customize your API playground by defining the following properties in your `docs.json`.
Configurations for the API playground.
The display mode of the API playground.
* `"interactive"`: Display the interactive playground.
* `"simple"`: Display a copyable endpoint with no playground.
* `"none"`: Display nothing.
* `"auth"`: Display the interactive playground only to authenticated users. Unauthenticated users or users not in the required groups see no playground.
Defaults to `interactive`.
Whether to pass API requests through Mintlify's proxy server. Defaults to `true`.
When `true`, playground requests are routed through Mintlify's servers. When `false`, the playground sends requests directly from the browser to your API. Set to `false` when your API accepts direct browser requests and you don't need Mintlify to proxy the traffic. For example, when your API requires specific headers that can't be forwarded through the proxy or when you need the request to originate directly from the user's browser for authentication purposes.
Whether to include cookies, authorization headers, and TLS client certificates for cross-origin requests when `proxy` is `false`. Defaults to `false`.
When `true` and `proxy` is `false`, the playground sends requests with browser-managed credentials included. For example, when your API uses cookie-based authentication or HTTP session tokens.
This option has no effect when `proxy` is `true`.
The display mode for base URLs in endpoint headers. When set to `full`, the full base URL displays for every endpoint page. By default, only the relative endpoint path displays.
Configurations for the autogenerated API examples.
Example languages for the autogenerated API snippets.
Languages display in the order specified.
| Display name | Key | Aliases |
| ------------ | ------------ | ------------------------- |
| cURL | `bash` | `curl`, `sh`, `shell` |
| Python | `python` | `py` |
| JavaScript | `javascript` | `js` |
| Node.js | `node` | `nodejs`, `node.js` |
| PHP | `php` | |
| Go | `go` | `golang` |
| Java | `java` | |
| Ruby | `ruby` | `rb` |
| PowerShell | `powershell` | |
| Swift | `swift` | |
| C# | `csharp` | `c#` |
| .NET | `dotnet` | `.net`, `.NET`, `dot-net` |
| TypeScript | `typescript` | `ts` |
| C | `c` | |
| C++ | `c++` | `cpp` |
| Kotlin | `kotlin` | `kt` |
| Rust | `rust` | `rs` |
| Dart | `dart` | `flutter` |
Whether to show optional parameters in API examples. Defaults to `all`.
Whether to prefill the API playground with data from schema examples. When enabled, the playground automatically populates request fields with example values from your OpenAPI specification. Defaults to `false`.
Whether to generate code samples for endpoints from API specifications. Defaults to `true`. When set to `false`, only manually written code samples (from `x-codeSamples` in OpenAPI specifications or `` components in MDX) appear in the API playground.
### Example configuration
This example configures the API playground to be interactive with example code snippets for cURL, Python, and JavaScript. It only shows required parameters in the code snippets, and the playground prefills the request body with example values.
```json theme={null}
{
"api": {
"playground": {
"display": "interactive"
},
"examples": {
"languages": ["curl", "python", "javascript"],
"defaults": "required",
"prefill": true
}
}
}
```
### Auth-based playground display
Use the `auth` display mode to show the interactive playground only to authenticated users. This is useful when you want to let users view your API documentation publicly while restricting playground access to logged-in users.
When `display` is set to `auth`:
* Authenticated users see the interactive playground.
* Unauthenticated users see no playground (equivalent to `none`).
You can also combine `auth` with the `groups` property in page frontmatter to restrict playground access to specific user groups.
```mdx Page with group-restricted playground theme={null}
---
title: "Create user"
openapi: POST /users
playground: auth
groups: ["admin", "developer"]
public: true
---
```
In this example:
* The page is publicly visible (anyone can view the documentation).
* Only authenticated users in the `admin` or `developer` groups see the interactive playground.
* Users not in those groups see no playground.
If the page has no `groups` property, all authenticated users see the interactive playground.
The `auth` display mode requires your documentation to have [authentication](/deploy/authentication-setup) configured.
### Custom endpoint pages
When you need more control over your API documentation, use the `x-mint` extension in your OpenAPI specification or create individual MDX pages for your endpoints.
Both options allow you to:
* Customize page metadata
* Add additional content like examples
* Control playground behavior per page
Use the `x-mint` extension so that all of your API documentation generates automatically from your OpenAPI specification and stays maintained in one file.
Use individual MDX pages for small APIs or when you want to experiment with changes on a per-page basis.
## Response rendering
The playground automatically renders responses based on the `Content-Type` header returned by your API.
* **Images**: Rendered inline (`image/*`).
* **Audio**: Rendered with a built-in audio player (`audio/*`).
* **Video**: Rendered with a built-in video player (`video/*`). Any response with a `video/*` content type, such as `video/mp4` or `video/webm`, displays as a playable video directly in the playground.
* **All other responses**: Displayed in a code block.
## Parameter anchor links
Every parameter in the API playground has a clickable anchor link. Hover over a parameter name to reveal the link icon, then click to copy a direct URL to that parameter.
Use parameter anchor links to:
* Share links to specific parameters in support conversations or documentation
* Navigate directly to a parameter from another page or external resource
* Bookmark frequently referenced parameters
The URL format is `your-docs-url/endpoint-path#parameter-name`. For nested parameters, the anchor includes the parent path.
## Further reading
* [OpenAPI setup](/api-playground/openapi-setup) for more information on creating your OpenAPI document.
* [x-mint extension](/api-playground/openapi-setup#customize-your-endpoint-pages) for more information on customizing your endpoint pages.
* [MDX setup](/api-playground/mdx-setup) for more information on manually creating individual API reference pages.
* [AsyncAPI setup](/api-playground/asyncapi-setup) for more information on creating your AsyncAPI schema to generate WebSocket reference pages.
## Related topics
- [docs.json schema reference](/docs/organize/settings-reference.md)
- [How to link documentation pages effectively](/docs/guides/linking.md)
- [Analytics integrations](/docs/integrations/analytics/overview.md)
The playground generates interactive pages for your endpoints based on your OpenAPI specification or AsyncAPI schema. If you modify your API, the playground automatically updates the relevant pages.
Generate your API playground from an OpenAPI specification for the best results. You can also manually create API reference pages after defining a base URL and authentication method in your `docs.json`.
## Get started
Validate your OpenAPI specification file using the [Swagger Editor](https://editor.swagger.io/) or [Mint CLI](https://www.npmjs.com/package/mint) command `mint validate`.
```bash {3} theme={null}
/your-project
|- docs.json
|- openapi.json
```
Update your `docs.json` to reference your OpenAPI specification.
**To automatically generate pages for all endpoints in your OpenAPI specification**, add an `openapi` property to any navigation element.
This example generates a page for each endpoint specified in `openapi.json` and organizes the pages in the "API reference" group.
```json Generate all endpoint pages theme={null}
"navigation": {
"groups": [
{
"group": "API reference",
"openapi": "openapi.json"
}
]
}
```
**To generate pages for only specific endpoints**, list the endpoints in the `pages` property of the navigation element.
This example generates pages for only the `GET /users` and `POST /users` endpoints. To generate other endpoint pages, add additional endpoints to the `pages` array.
```json Generate specific endpoint pages theme={null}
"navigation": {
"groups": [
{
"group": "API reference",
"openapi": "openapi.json",
"pages": [
"GET /users",
"POST /users"
]
}
]
}
```
## Customize your playground
Customize your API playground by defining the following properties in your `docs.json`.
Configurations for the API playground.
The display mode of the API playground.
* `"interactive"`: Display the interactive playground.
* `"simple"`: Display a copyable endpoint with no playground.
* `"none"`: Display nothing.
* `"auth"`: Display the interactive playground only to authenticated users. Unauthenticated users or users not in the required groups see no playground.
Defaults to `interactive`.
Whether to pass API requests through Mintlify's proxy server. Defaults to `true`.
When `true`, playground requests are routed through Mintlify's servers. When `false`, the playground sends requests directly from the browser to your API. Set to `false` when your API accepts direct browser requests and you don't need Mintlify to proxy the traffic. For example, when your API requires specific headers that can't be forwarded through the proxy or when you need the request to originate directly from the user's browser for authentication purposes.
Whether to include cookies, authorization headers, and TLS client certificates for cross-origin requests when `proxy` is `false`. Defaults to `false`.
When `true` and `proxy` is `false`, the playground sends requests with browser-managed credentials included. For example, when your API uses cookie-based authentication or HTTP session tokens.
This option has no effect when `proxy` is `true`.
The display mode for base URLs in endpoint headers. When set to `full`, the full base URL displays for every endpoint page. By default, only the relative endpoint path displays.
Configurations for the autogenerated API examples.
Example languages for the autogenerated API snippets.
Languages display in the order specified.
| Display name | Key | Aliases |
| ------------ | ------------ | ------------------------- |
| cURL | `bash` | `curl`, `sh`, `shell` |
| Python | `python` | `py` |
| JavaScript | `javascript` | `js` |
| Node.js | `node` | `nodejs`, `node.js` |
| PHP | `php` | |
| Go | `go` | `golang` |
| Java | `java` | |
| Ruby | `ruby` | `rb` |
| PowerShell | `powershell` | |
| Swift | `swift` | |
| C# | `csharp` | `c#` |
| .NET | `dotnet` | `.net`, `.NET`, `dot-net` |
| TypeScript | `typescript` | `ts` |
| C | `c` | |
| C++ | `c++` | `cpp` |
| Kotlin | `kotlin` | `kt` |
| Rust | `rust` | `rs` |
| Dart | `dart` | `flutter` |
Whether to show optional parameters in API examples. Defaults to `all`.
Whether to prefill the API playground with data from schema examples. When enabled, the playground automatically populates request fields with example values from your OpenAPI specification. Defaults to `false`.
Whether to generate code samples for endpoints from API specifications. Defaults to `true`. When set to `false`, only manually written code samples (from `x-codeSamples` in OpenAPI specifications or `` components in MDX) appear in the API playground.
### Example configuration
This example configures the API playground to be interactive with example code snippets for cURL, Python, and JavaScript. It only shows required parameters in the code snippets, and the playground prefills the request body with example values.
```json theme={null}
{
"api": {
"playground": {
"display": "interactive"
},
"examples": {
"languages": ["curl", "python", "javascript"],
"defaults": "required",
"prefill": true
}
}
}
```
### Auth-based playground display
Use the `auth` display mode to show the interactive playground only to authenticated users. This is useful when you want to let users view your API documentation publicly while restricting playground access to logged-in users.
When `display` is set to `auth`:
* Authenticated users see the interactive playground.
* Unauthenticated users see no playground (equivalent to `none`).
You can also combine `auth` with the `groups` property in page frontmatter to restrict playground access to specific user groups.
```mdx Page with group-restricted playground theme={null}
---
title: "Create user"
openapi: POST /users
playground: auth
groups: ["admin", "developer"]
public: true
---
```
In this example:
* The page is publicly visible (anyone can view the documentation).
* Only authenticated users in the `admin` or `developer` groups see the interactive playground.
* Users not in those groups see no playground.
If the page has no `groups` property, all authenticated users see the interactive playground.
The `auth` display mode requires your documentation to have [authentication](/deploy/authentication-setup) configured.
### Custom endpoint pages
When you need more control over your API documentation, use the `x-mint` extension in your OpenAPI specification or create individual MDX pages for your endpoints.
Both options allow you to:
* Customize page metadata
* Add additional content like examples
* Control playground behavior per page
Use the `x-mint` extension so that all of your API documentation generates automatically from your OpenAPI specification and stays maintained in one file.
Use individual MDX pages for small APIs or when you want to experiment with changes on a per-page basis.
## Response rendering
The playground automatically renders responses based on the `Content-Type` header returned by your API.
* **Images**: Rendered inline (`image/*`).
* **Audio**: Rendered with a built-in audio player (`audio/*`).
* **Video**: Rendered with a built-in video player (`video/*`). Any response with a `video/*` content type, such as `video/mp4` or `video/webm`, displays as a playable video directly in the playground.
* **All other responses**: Displayed in a code block.
## Parameter anchor links
Every parameter in the API playground has a clickable anchor link. Hover over a parameter name to reveal the link icon, then click to copy a direct URL to that parameter.
Use parameter anchor links to:
* Share links to specific parameters in support conversations or documentation
* Navigate directly to a parameter from another page or external resource
* Bookmark frequently referenced parameters
The URL format is `your-docs-url/endpoint-path#parameter-name`. For nested parameters, the anchor includes the parent path.
## Further reading
* [OpenAPI setup](/api-playground/openapi-setup) for more information on creating your OpenAPI document.
* [x-mint extension](/api-playground/openapi-setup#customize-your-endpoint-pages) for more information on customizing your endpoint pages.
* [MDX setup](/api-playground/mdx-setup) for more information on manually creating individual API reference pages.
* [AsyncAPI setup](/api-playground/asyncapi-setup) for more information on creating your AsyncAPI schema to generate WebSocket reference pages.
## Related topics
- [docs.json schema reference](/docs/organize/settings-reference.md)
- [How to link documentation pages effectively](/docs/guides/linking.md)
- [Analytics integrations](/docs/integrations/analytics/overview.md)