> ## Documentation Index
> Fetch the complete documentation index at: https://www.mintlify.com/docs/llms.txt
> Use this file to discover all available pages before exploring further.
# Branching and publishing
> Understand how branches and protection rules determine what happens when you publish, and how to manage the full review and deployment workflow.
The web editor autosaves everything as you type, but your changes are only live when you choose to publish them.
What happens when you publish depends on two things: **which branch you're on** and **whether that branch requires pull requests**.
## Saving versus publishing
**Saving** happens automatically. Mintlify stores your edits on its servers and persists them across browser tabs, devices, and network interruptions.
**Publishing** commits your changes to your Git repository. Click **Publish** in the toolbar to open the publish menu, save your changes as a Git commit, and create a pull request.
The editor tracks the following as pending changes:
* Content edits in pages
* New or deleted pages
* Navigation structure changes
* Media uploads
* Configuration updates
## What happens when you publish
The actions available when you click the publish button depend on your current branch and whether it has branch protection rules that require pull requests.
| Branch type | Branch protection | Available actions |
| -------------------------------------------------------------------------------------------------------------------------------------------------------- | ---------------------- | ------------------------------------------------- |
| Deployment branch | None | **Publish** directly to your live site |
| Deployment branch | Pull requests required | **Create branch** to move changes to a new branch |
| Feature branch | None | **Save in branch**, **Create pull request** |
| Feature branch | Pull requests required | **Save in branch**, **Create pull request** |
* **Publish**: Commits and deploys your changes to your live site immediately.
* **Save in branch**: Commits your changes to the feature branch without merging to your deployment branch.
* **Create branch**: Moves your pending changes to a new feature branch when you're on a protected deployment branch.
* **Create pull request**: Opens a pull request targeting your deployment branch.
If there are no pending changes, the editor disables the publish and save actions.
Your live site updates after Mintlify builds and deploys your changes. This typically takes 30 seconds to a few minutes. Check the deployment status on your [dashboard](https://app.mintlify.com).
## When to use a branch
**Edit directly on your deployment branch** if you do not use a Git-based workflow.
**Create a branch** when you use a docs-as-code workflow where you make each change to your content on a separate branch.
## Create and switch branches
### Create a branch
1. Click the branch name in the editor toolbar.
2. Click **Create new branch**.
3. If you have pending changes, choose whether to bring them to the new branch or leave them on the current branch.
4. Enter a name and click **Create branch**.
Use descriptive branch names so you can easily identify them and other people understand what each branch is for.
### Switch branches
1. Click the branch name in the toolbar.
2. Search for or scroll to the branch you want.
3. Click the branch to switch to it.
Switching branches while you have unpublished changes prompts you to bring those changes to the new branch or leave them behind. Changes left behind remain on your original branch.
To copy a branch name, hover over the branch in the dropdown and click the copy icon. This is useful when sharing the branch with teammates or referencing it in a pull request.
## Preview your changes
Every time you save changes to a feature branch, Mintlify builds a preview deployment—a temporary URL where your changes render exactly as they look when published.
### Access and share a preview
1. Click **Publish** in the editor toolbar.
2. In the publish menu, click the preview URL. The URL format is `organization-branch-name.mintlify.app`.
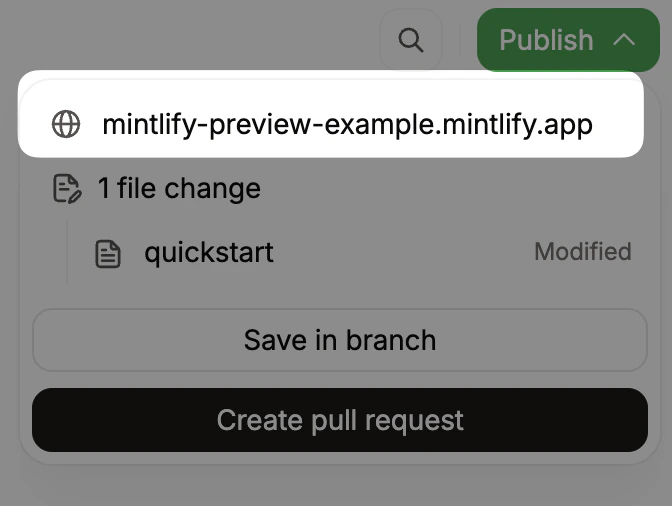
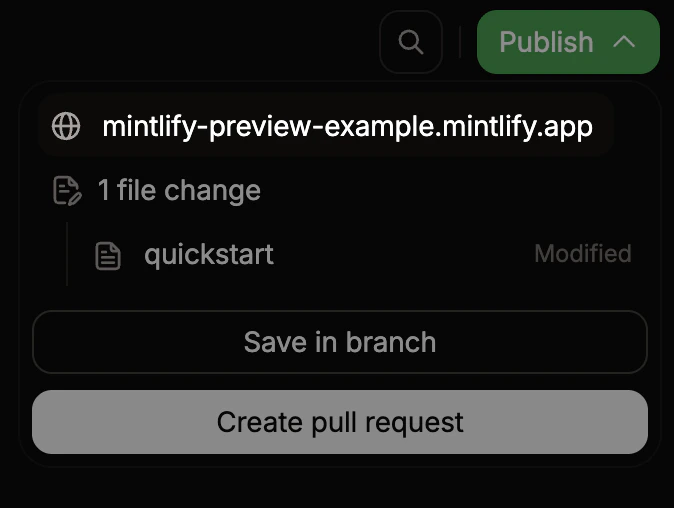 Copy the URL and send it to reviewers. The preview updates automatically each time you save to the branch.
### Restrict access to previews
Preview URLs are publicly accessible by default. To restrict access to members of your Mintlify organization, enable preview authentication in the [Add-ons](https://app.mintlify.com/products/addons) page of your dashboard.
### Share editor links
To invite a teammate to a specific page on a branch, copy the URL from your browser's address bar and share it. Anyone with access to your Mintlify organization can open the link directly in their editor session.
The URL format is:
```text theme={null}
https://app.mintlify.com/{org}/{project}/editor/{branch}/~/{filepath}
```
For example: `https://app.mintlify.com/acme/docs/editor/main/~/guides/quickstart.mdx`
## Review and merge pull requests
When a pull request is open for the current branch, the publish menu shows a review panel with:
* The pull request title, description, and whether it is a draft.
* The source and target branches.
* The number of changed files.
* The approval requirement on the deployment branch: **Approval required**, **Code owner required**, or no requirement.
* The current review status: **Approved**, **Changes requested**, or **Awaiting review**.
Click **Open in GitHub** or **Open in GitLab** to view the pull request in your Git provider.
After a reviewer approves a pull request, click **Merge and publish** to merge and deploy directly from the editor. The editor switches to your deployment branch after merging.
### Approve pull requests from the editor
For GitHub repositories, reviewers can approve open pull requests in the editor. When a pull request is open, an **Approve pull request** button appears in the review panel if your account has permission to review it. Click **Approve pull request** when the changes are ready to be merged. The review status updates to **Approved** and the **Merge and publish** action becomes available.
The approve action is not available for draft pull requests, pull requests you have already approved, or GitLab merge requests. Click **Open in GitLab** to approve a merge request in GitLab.
Configure branch protection rules in your Git provider to require pull requests. See [About protected branches](https://docs.github.com/en/repositories/configuring-branches-and-merges-in-your-repository/managing-protected-branches/about-protected-branches) in the GitHub docs or [Protected branches](https://docs.gitlab.com/user/project/repository/branches/protected/) in the GitLab docs.
### Review changes before merging
Click any changed file in the publish menu to open it in diff view and compare your branch against the published version. Files that can't display a diff, such as images or deleted files, appear in the list but aren't clickable.
### Simultaneous publishing
Only one publish can happen at a time per branch. If another team member publishes to the same branch, wait for the current publish to complete before trying again.
### Commit messages
When you publish, you can enter a commit message before confirming. If you leave it blank, the editor uses a default message that lists the files you created, updated, moved, or deleted.
## Resolve conflicts
Conflicts occur when your branch and the deployment branch have incompatible changes to the same files. For example, when you and a teammate edited the same lines in a file or moved a file to different locations.
The editor displays a warning when conflicts block publishing. Follow the prompts to choose which version of each conflicting section to keep.
## Collaborate in real time
When multiple people open the same page on the same branch, they edit together in real time. Each person's cursor and edits are visible to everyone, with avatars shown in the toolbar.
* Changes from all collaborators merge automatically. Two people editing the same section won't create conflicts.
* Undo only affects your own edits.
* If you lose your connection, edits save locally and sync when you reconnect.
When the [Mintlify agent](/agent) edits a page through the API or MCP, it appears in the editor like any other collaborator. You see the agent's avatar in the toolbar and a live cursor at its most recent edit location. The cursor clears automatically after the agent finishes.
## Git sync
When someone pushes changes to your repository from outside the editor, the editor incorporates those changes automatically.
Non-overlapping changes apply automatically. If a remote change and your local edit affect the same part of a page, the editor highlights the conflict so you can resolve it.
## Commit signing
Sign commits with your GitHub account by authorizing it in your [account settings](https://app.mintlify.com/settings/account). Without authorization, the Mintlify GitHub App signs commits made in the web editor.
## Git operations reference
For reference, here is how editor actions map to underlying Git operations.
| Action in the editor | Git operation |
| --------------------------------- | ---------------------------------------------------------------------------- |
| Edit a page | Changes auto-save to Mintlify servers. No Git commit yet. |
| Publish on your deployment branch | `git commit` and `git push`. Triggers a deployment. |
| Save in branch | `git commit` to the current feature branch. |
| Create pull request | `git push` and opens a pull request against your deployment branch. |
| Merge and publish | Merges the pull request and triggers a deployment. |
| Create a branch | `git checkout -b ` |
| Switch branches | `git checkout ` |
| External push or CLI update | Incoming changes sync into the editor automatically using a three-way merge. |
## Related topics
- [Editor settings for AI and publishing](/docs/editor/settings.md)
- [Editor overview](/docs/editor/index.md)
- [Exclude files from publishing](/docs/organize/mintignore.md)
Copy the URL and send it to reviewers. The preview updates automatically each time you save to the branch.
### Restrict access to previews
Preview URLs are publicly accessible by default. To restrict access to members of your Mintlify organization, enable preview authentication in the [Add-ons](https://app.mintlify.com/products/addons) page of your dashboard.
### Share editor links
To invite a teammate to a specific page on a branch, copy the URL from your browser's address bar and share it. Anyone with access to your Mintlify organization can open the link directly in their editor session.
The URL format is:
```text theme={null}
https://app.mintlify.com/{org}/{project}/editor/{branch}/~/{filepath}
```
For example: `https://app.mintlify.com/acme/docs/editor/main/~/guides/quickstart.mdx`
## Review and merge pull requests
When a pull request is open for the current branch, the publish menu shows a review panel with:
* The pull request title, description, and whether it is a draft.
* The source and target branches.
* The number of changed files.
* The approval requirement on the deployment branch: **Approval required**, **Code owner required**, or no requirement.
* The current review status: **Approved**, **Changes requested**, or **Awaiting review**.
Click **Open in GitHub** or **Open in GitLab** to view the pull request in your Git provider.
After a reviewer approves a pull request, click **Merge and publish** to merge and deploy directly from the editor. The editor switches to your deployment branch after merging.
### Approve pull requests from the editor
For GitHub repositories, reviewers can approve open pull requests in the editor. When a pull request is open, an **Approve pull request** button appears in the review panel if your account has permission to review it. Click **Approve pull request** when the changes are ready to be merged. The review status updates to **Approved** and the **Merge and publish** action becomes available.
The approve action is not available for draft pull requests, pull requests you have already approved, or GitLab merge requests. Click **Open in GitLab** to approve a merge request in GitLab.
Configure branch protection rules in your Git provider to require pull requests. See [About protected branches](https://docs.github.com/en/repositories/configuring-branches-and-merges-in-your-repository/managing-protected-branches/about-protected-branches) in the GitHub docs or [Protected branches](https://docs.gitlab.com/user/project/repository/branches/protected/) in the GitLab docs.
### Review changes before merging
Click any changed file in the publish menu to open it in diff view and compare your branch against the published version. Files that can't display a diff, such as images or deleted files, appear in the list but aren't clickable.
### Simultaneous publishing
Only one publish can happen at a time per branch. If another team member publishes to the same branch, wait for the current publish to complete before trying again.
### Commit messages
When you publish, you can enter a commit message before confirming. If you leave it blank, the editor uses a default message that lists the files you created, updated, moved, or deleted.
## Resolve conflicts
Conflicts occur when your branch and the deployment branch have incompatible changes to the same files. For example, when you and a teammate edited the same lines in a file or moved a file to different locations.
The editor displays a warning when conflicts block publishing. Follow the prompts to choose which version of each conflicting section to keep.
## Collaborate in real time
When multiple people open the same page on the same branch, they edit together in real time. Each person's cursor and edits are visible to everyone, with avatars shown in the toolbar.
* Changes from all collaborators merge automatically. Two people editing the same section won't create conflicts.
* Undo only affects your own edits.
* If you lose your connection, edits save locally and sync when you reconnect.
When the [Mintlify agent](/agent) edits a page through the API or MCP, it appears in the editor like any other collaborator. You see the agent's avatar in the toolbar and a live cursor at its most recent edit location. The cursor clears automatically after the agent finishes.
## Git sync
When someone pushes changes to your repository from outside the editor, the editor incorporates those changes automatically.
Non-overlapping changes apply automatically. If a remote change and your local edit affect the same part of a page, the editor highlights the conflict so you can resolve it.
## Commit signing
Sign commits with your GitHub account by authorizing it in your [account settings](https://app.mintlify.com/settings/account). Without authorization, the Mintlify GitHub App signs commits made in the web editor.
## Git operations reference
For reference, here is how editor actions map to underlying Git operations.
| Action in the editor | Git operation |
| --------------------------------- | ---------------------------------------------------------------------------- |
| Edit a page | Changes auto-save to Mintlify servers. No Git commit yet. |
| Publish on your deployment branch | `git commit` and `git push`. Triggers a deployment. |
| Save in branch | `git commit` to the current feature branch. |
| Create pull request | `git push` and opens a pull request against your deployment branch. |
| Merge and publish | Merges the pull request and triggers a deployment. |
| Create a branch | `git checkout -b ` |
| Switch branches | `git checkout ` |
| External push or CLI update | Incoming changes sync into the editor automatically using a three-way merge. |
## Related topics
- [Editor settings for AI and publishing](/docs/editor/settings.md)
- [Editor overview](/docs/editor/index.md)
- [Exclude files from publishing](/docs/organize/mintignore.md)