> ## Documentation Index
> Fetch the complete documentation index at: https://www.mintlify.com/docs/llms.txt
> Use this file to discover all available pages before exploring further.
# Create and edit pages
> Create pages, edit content, upload images and video, and manage files in the Mintlify web editor with rich-text editing and search across your docs.
## Navigate files
Browse pages in the **Navigation** tab of the left panel. Click a page to open it. Click the search icon or press Cmd + K (macOS) or Ctrl + K (Windows) to search by filename or page content.
The web editor treats API specification files (OpenAPI and AsyncAPI) as read-only. To update a spec file, edit it in your preferred code editor and push the changes to your documentation repository.
## Create new pages
1. Click the plus button in the navigation element where you want to add a page.
2. Click **Add a page**.
3. Enter a filename. The editor adds the `.mdx` extension automatically.
## Edit content
Switch between visual and Markdown mode with the toggle in the toolbar.
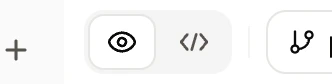
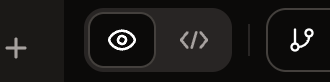 **Visual mode** shows a real-time preview as you type. Press / to open the component menu and insert components, images, videos, and other content. You can also drag and drop media files directly onto the page from your computer or from the navigation tree. Other shortcuts:
* **Insert a link**: Select text and press Cmd + K (macOS) or Ctrl + K (Windows), or drag a page from the navigation tree into the editor to create a link with the page title.
* **Link to another page**: Right-click a page in the navigation tree, click **Copy link**, then paste the link into your content. The editor recognizes internal links to other pages and converts them.
* **Insert media from your project**: Drag an image or video from the navigation tree into the page to embed it inline. Supported formats include PNG, JPG, JPEG, GIF, WebP, SVG, MP4, and WebM.
* **Insert an emoji**: Type : followed by a keyword to open the emoji picker.
* **Edit a table**: When your cursor is inside a table, use the floating toolbar to add or remove rows and columns, or merge cells.
**Markdown mode** gives you direct access to the MDX source. Use it for precise control over component properties and frontmatter.
The web editor treats API specification files (OpenAPI and AsyncAPI) as read-only. Edit them in your code editor and push the changes to your repository.
For a full list of components, see [Components](/components). For MDX syntax, see [Format text](/create/text) and [Format code](/create/code).
### Block actions
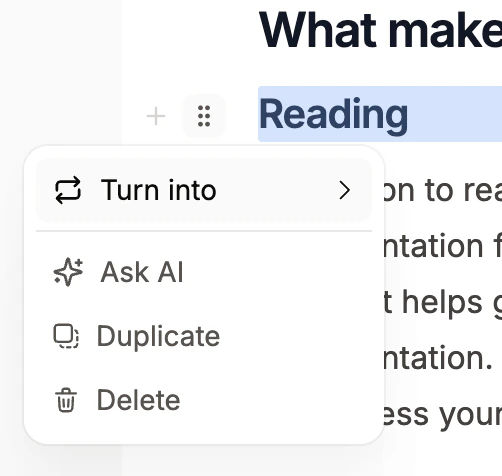
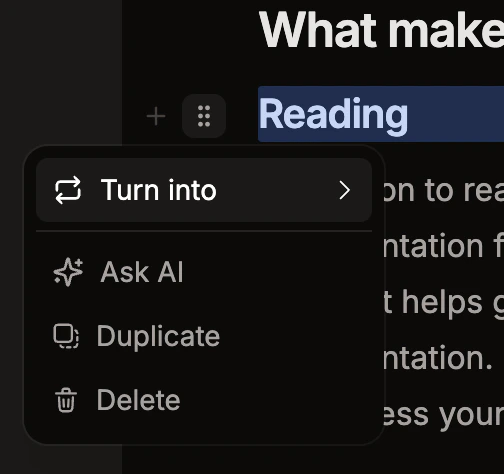
In visual mode, hover over any block to reveal a drag handle on the left. Click the handle to open a context menu with actions for that block:
* **Turn into**: Convert the block to a different type—text, headings, blockquote, or list.
* **Duplicate**: Insert a copy of the block immediately after it.
* **Delete**: Remove the block.
**Visual mode** shows a real-time preview as you type. Press / to open the component menu and insert components, images, videos, and other content. You can also drag and drop media files directly onto the page from your computer or from the navigation tree. Other shortcuts:
* **Insert a link**: Select text and press Cmd + K (macOS) or Ctrl + K (Windows), or drag a page from the navigation tree into the editor to create a link with the page title.
* **Link to another page**: Right-click a page in the navigation tree, click **Copy link**, then paste the link into your content. The editor recognizes internal links to other pages and converts them.
* **Insert media from your project**: Drag an image or video from the navigation tree into the page to embed it inline. Supported formats include PNG, JPG, JPEG, GIF, WebP, SVG, MP4, and WebM.
* **Insert an emoji**: Type : followed by a keyword to open the emoji picker.
* **Edit a table**: When your cursor is inside a table, use the floating toolbar to add or remove rows and columns, or merge cells.
**Markdown mode** gives you direct access to the MDX source. Use it for precise control over component properties and frontmatter.
The web editor treats API specification files (OpenAPI and AsyncAPI) as read-only. Edit them in your code editor and push the changes to your repository.
For a full list of components, see [Components](/components). For MDX syntax, see [Format text](/create/text) and [Format code](/create/code).
### Block actions
In visual mode, hover over any block to reveal a drag handle on the left. Click the handle to open a context menu with actions for that block:
* **Turn into**: Convert the block to a different type—text, headings, blockquote, or list.
* **Duplicate**: Insert a copy of the block immediately after it.
* **Delete**: Remove the block.
 ### Table of contents
In visual mode, the editor shows a minimap on the right side of the page that reflects the heading structure of your document. Hover over the minimap to expand it into a full table of contents. Click any heading to scroll to that section.
### Code block options
When editing a code block in visual mode, you can:
* **Highlight or focus lines**: Select text within the code block, then use the toolbar that appears to mark lines as highlighted or focused. Highlighting visually emphasizes lines. Focusing lines dims everything else.
* **Mark diff lines**: Select lines and use the toolbar to mark them as additions (`+`) or removals (`-`).
* **Wrap**: Toggle line wrapping in the code block settings.
* **Expandable**: Make the code block collapsible so readers can expand it on demand.
## Review changes before publishing
Open the publish menu and click any changed file to enter diff view. The editor highlights differences between your draft and the last published version. If you're in visual mode, you see a visual diff. If you're in Markdown mode, you see a Markdown diff.
Diff view is read-only. Click the button next to the mode toggle to return to editing.
## Manage pages
* **Move**: Drag and drop pages to reorder them in navigation.
* **Rename**: Right-click a page and select **Rename**.
* **Duplicate**: Right-click a page and select **Duplicate**.
* **Delete**: Right-click a page and select **Delete**. The editor removes the page from navigation automatically.
### Pages deleted via Git
If a teammate deletes a page through Git while you have it open, the editor enters read-only mode and shows a banner. The editor preserves your content so you can copy it before navigating away.
## Configure pages
Hover over a page and click the gear icon, or right-click and select **Settings**, to configure:
* **Title**, **Slug**, and **Sidebar title**: Control how the page appears in navigation and its URL.
* **Description** and **Keywords**: Improve search and SEO.
* **Layout**: Choose from standard, wide, centered, or custom.
For details on each setting, see [Pages](/organize/pages).
## Add media
### Images and videos
Type /image to upload a new image or select an existing one from your repository. Type /video to upload or select a video.
You can also drag and drop files from your computer directly onto a page. In visual mode, the file inserts inline. In Markdown mode, the editor inserts the file path at your cursor position. Images save to your `images/` folder and videos to `videos/`.
To reuse media that already lives in your project, drag an image or video file from the navigation tree onto the page. The editor embeds the asset inline.
### Light and dark image variants
After inserting an image in visual mode, hover over it to reveal the image toolbar. Use **Light/dark variants** to upload separate images for light and dark mode.
### Embed external media
Type /embed and paste a YouTube, Loom, or Vimeo URL. The editor detects the provider and generates the iframe. Searching the slash menu for `youtube`, `yt`, `loom`, or `vimeo` also surfaces the **Embed** command.
For other embeds, type /embed and toggle **Manual embed** to write custom HTML.
For more on formatting images and using the Frame component, see [Images and embeds](/create/image-embeds).
## Related topics
- [Create manual API pages](/docs/api-playground/mdx-setup.md)
- [Create a knowledge base](/docs/guides/knowledge-base.md)
- [How to use the editor](/docs/editor/tutorial.md)
### Table of contents
In visual mode, the editor shows a minimap on the right side of the page that reflects the heading structure of your document. Hover over the minimap to expand it into a full table of contents. Click any heading to scroll to that section.
### Code block options
When editing a code block in visual mode, you can:
* **Highlight or focus lines**: Select text within the code block, then use the toolbar that appears to mark lines as highlighted or focused. Highlighting visually emphasizes lines. Focusing lines dims everything else.
* **Mark diff lines**: Select lines and use the toolbar to mark them as additions (`+`) or removals (`-`).
* **Wrap**: Toggle line wrapping in the code block settings.
* **Expandable**: Make the code block collapsible so readers can expand it on demand.
## Review changes before publishing
Open the publish menu and click any changed file to enter diff view. The editor highlights differences between your draft and the last published version. If you're in visual mode, you see a visual diff. If you're in Markdown mode, you see a Markdown diff.
Diff view is read-only. Click the button next to the mode toggle to return to editing.
## Manage pages
* **Move**: Drag and drop pages to reorder them in navigation.
* **Rename**: Right-click a page and select **Rename**.
* **Duplicate**: Right-click a page and select **Duplicate**.
* **Delete**: Right-click a page and select **Delete**. The editor removes the page from navigation automatically.
### Pages deleted via Git
If a teammate deletes a page through Git while you have it open, the editor enters read-only mode and shows a banner. The editor preserves your content so you can copy it before navigating away.
## Configure pages
Hover over a page and click the gear icon, or right-click and select **Settings**, to configure:
* **Title**, **Slug**, and **Sidebar title**: Control how the page appears in navigation and its URL.
* **Description** and **Keywords**: Improve search and SEO.
* **Layout**: Choose from standard, wide, centered, or custom.
For details on each setting, see [Pages](/organize/pages).
## Add media
### Images and videos
Type /image to upload a new image or select an existing one from your repository. Type /video to upload or select a video.
You can also drag and drop files from your computer directly onto a page. In visual mode, the file inserts inline. In Markdown mode, the editor inserts the file path at your cursor position. Images save to your `images/` folder and videos to `videos/`.
To reuse media that already lives in your project, drag an image or video file from the navigation tree onto the page. The editor embeds the asset inline.
### Light and dark image variants
After inserting an image in visual mode, hover over it to reveal the image toolbar. Use **Light/dark variants** to upload separate images for light and dark mode.
### Embed external media
Type /embed and paste a YouTube, Loom, or Vimeo URL. The editor detects the provider and generates the iframe. Searching the slash menu for `youtube`, `yt`, `loom`, or `vimeo` also surfaces the **Embed** command.
For other embeds, type /embed and toggle **Manual embed** to write custom HTML.
For more on formatting images and using the Frame component, see [Images and embeds](/create/image-embeds).
## Related topics
- [Create manual API pages](/docs/api-playground/mdx-setup.md)
- [Create a knowledge base](/docs/guides/knowledge-base.md)
- [How to use the editor](/docs/editor/tutorial.md)