milcapy
Python library for 2D structural analysis of frames, trusses, and finite element membranes
What is milcapy?
milcapy is a comprehensive Python library for structural analysis of 2D frames and finite element membranes. It implements the direct stiffness method for frames and trusses, and the finite element method for membrane analysis, with closed-form solutions for 1D elements. The library incorporates advanced concepts from matrix structural analysis and supports multiple beam theories and membrane element types.Key Features
Frame & Truss Analysis
Analyze 2D frames and trusses with Timoshenko and Euler-Bernoulli beam theories
Finite Element Membranes
Multiple membrane elements: CST, Q4, Q6, Q6i, and Q8 with plane stress/strain
Advanced Features
End offsets (rigid arms), releases, elastic supports, and local node axes
Interactive Visualization
Built-in model viewer with deformation plots, force diagrams, and results
Supported Elements
milcapy supports a comprehensive range of structural elements:1D Elements
- Beams: Timoshenko and Euler-Bernoulli beam theories
- Trusses: Axial force members
2D Membrane Elements
- CST: Constant Strain Triangle (3 nodes, 2 DOF per node)
- Q4: Quadrilateral with 4 nodes and 2 DOF per node
- Q6: Quadrilateral with 4 nodes and 3 DOF per node (includes drilling DOF)
- Q6i: Rectangular element with 4 nodes, 2 DOF per node, and incompatible modes
- Q8: Quadrilateral with 8 nodes (4 mid-side nodes condensed), 2 DOF per node
Element Convergence
The library includes highly accurate finite element formulations. Below is a convergence study for a cantilever beam (2m length, 0.6m × 0.4m cross-section, E=2×10⁶, ν=0.2, 20 tonf tip load):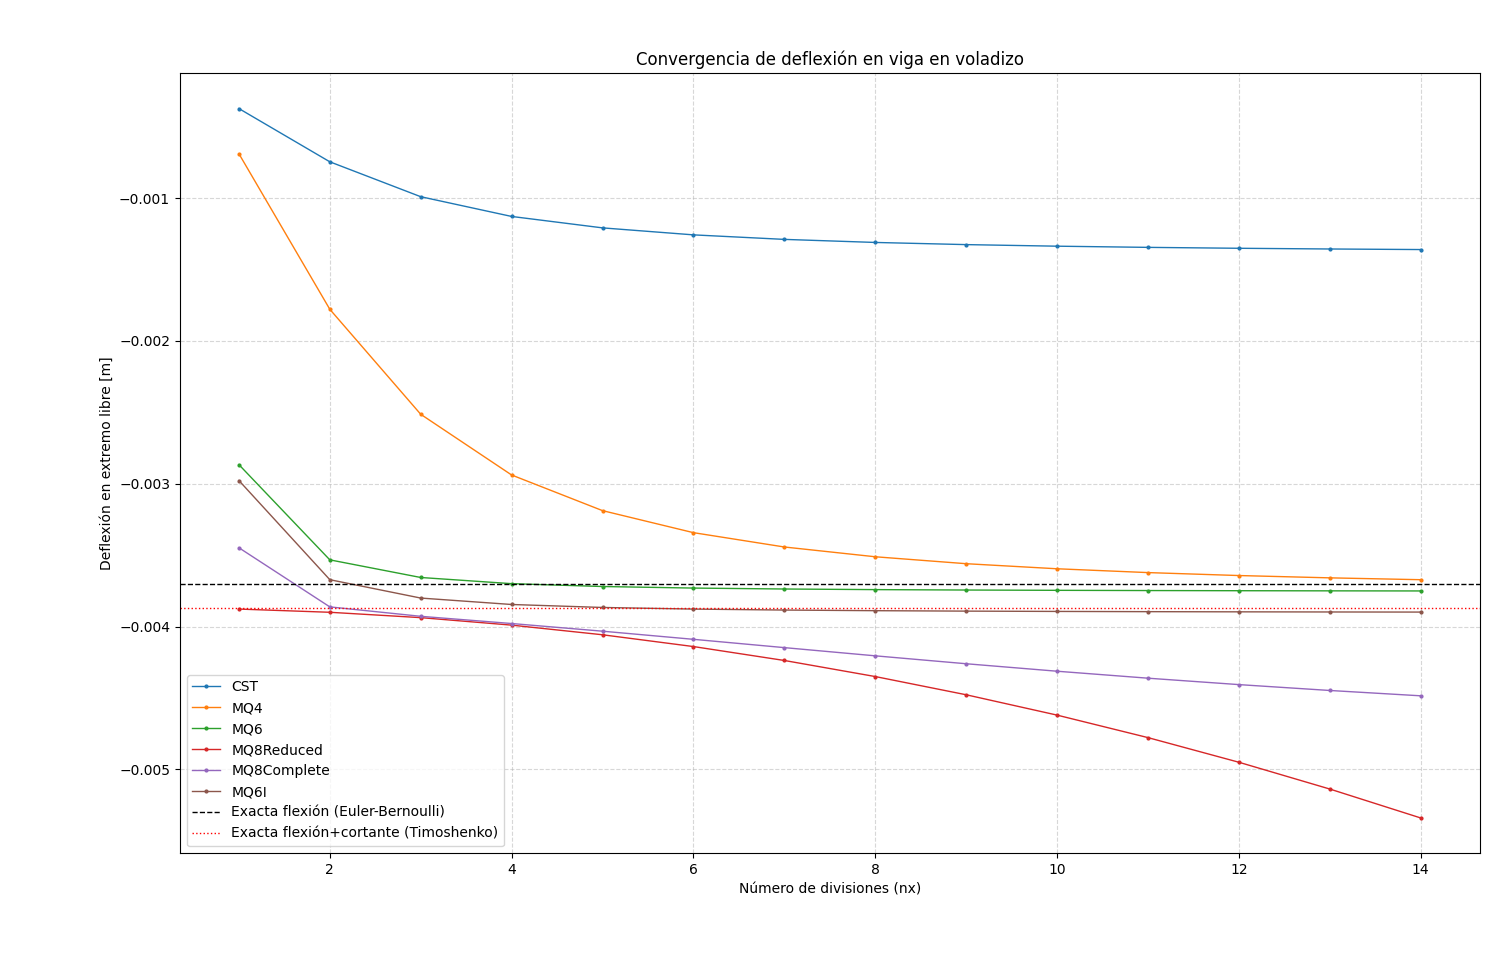
The Q8 element shows excellent convergence with a single element, while Q4 requires mesh refinement for accurate results.
Quick Example
Installation
Install milcapy using pip:Requirements
- Python ≥ 3.10
- NumPy
- Matplotlib
Next Steps
Installation
Get milcapy installed on your system
Quickstart
Build your first structural model
Core Concepts
Learn the fundamental concepts
API Reference
Explore the complete API