
Install from VS Code Marketplace
Vibrancy Continued is available on the Visual Studio Code Marketplace.Open VS Code Extensions
Press
Ctrl+Shift+X (Windows/Linux) or Cmd+Shift+X (macOS) to open the Extensions view.Each time VS Code updates, you’ll need to re-enable Vibrancy using the same steps (press
F1 and run “Reload Vibrancy”).Understanding the “Corrupt Installation” Warning
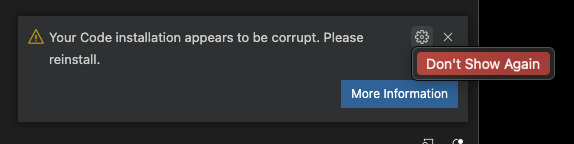
After enabling Vibrancy, you’ll see a warning that your VS Code installation appears to be corrupt:How to Dismiss the Warning
- Click the cogwheel icon on the warning notification
- Select “Don’t Show Again”

 All changes made by Vibrancy can be completely reverted by disabling the extension.
Alternative: Fix VSCode Checksums
If you don’t have the option to dismiss the warning, or see[Unsupported] in VS Code’s title bar, install this companion extension:
Fix VSCode Checksums Next
Platform-Specific Setup
Windows 10/11 Users (IMPORTANT)
This issue affects VS Code 1.86+ on Windows due to GPU compositing conflicts with Electron 27.Required Windows Setup Steps
Update VS Code Shortcut
Right-click your VS Code shortcut and select Properties. In the Target field, add
--disable-gpu-compositing at the end:Update Shell Configuration (Optional)
If you launch VS Code from the terminal using the Command Prompt (create a batch file or use doskey):
code command, add the same argument to your shell configuration:PowerShell ($PROFILE):Enable Disable Frameless Window
Open VS Code settings (
Ctrl+,) and enable:Disable Frameless Window (vscode_vibrancy.disableFramelessWindow)For detailed troubleshooting, see issue #140 and issue #122.
macOS Users
Vibrancy Continued supports both Intel and Apple Silicon Macs with native vibrancy effects.Permission Issues
If you encounterEACCES: permission denied errors:
App Translocation Issues
If you seeEROFS: read-only file system errors, VS Code is affected by App Translocation.
Fix: Move VS Code to /Applications using Finder, or run:
Supported Platforms
macOS
Intel and Apple Silicon (M1/M2/M3)
Windows
Windows 10/11 (x64 & ARM64)
Supported Editors
- Visual Studio Code - Fully supported
- VSCodium - Fully supported
- Cursor - Supported (use Fix VSCode Checksums Next to remove persistent warnings)
Permission Requirements
Windows
If you see “Run Visual Studio Code with administrator privileges”:- Close VS Code completely
- Right-click VS Code and select Run as administrator
- Run the “Enable Vibrancy” or “Reload Vibrancy” command again
This typically occurs with VS Code System Installer. Consider using the User Installer to avoid permission issues.
macOS
Vibrancy requires write access to VS Code’s application files. If you installed VS Code with restricted permissions, see the permission fixes above.Updating Vibrancy
When VS Code updates, Vibrancy must be reapplied:- Press
F1 - Run “Reload Vibrancy”
- Restart VS Code
Vibrancy will prompt you automatically when an update is needed.
Uninstalling Vibrancy
To completely remove Vibrancy:You can also just uninstall the extension directly - it will automatically clean up when uninstalled.
Next Steps
Quickstart Guide
Get vibrancy working in 5 minutes
Configuration
Customize themes, opacity, and effects