
Khoj Cloud Setup
Connecting Notion to Khoj Cloud is quick and easy with OAuth authentication.Navigate to Settings
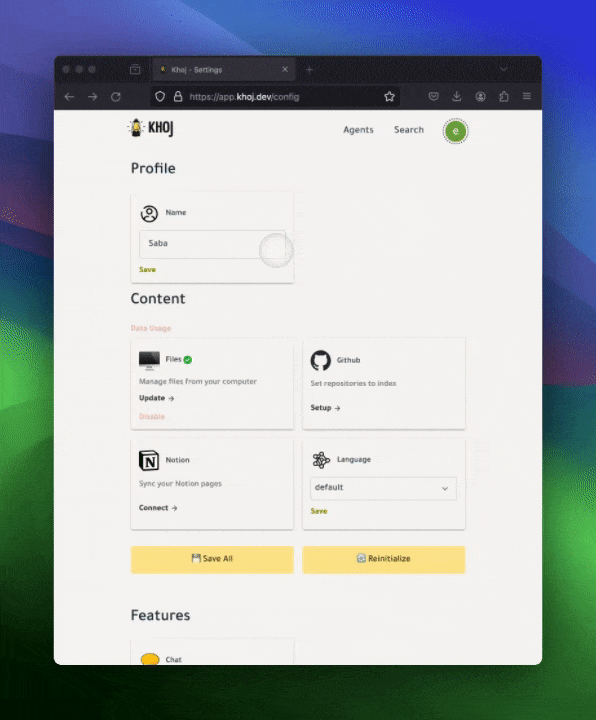
Go to app.khoj.dev/settings
Select Workspaces
In the Notion authorization flow, select which pages and databases you want to share with Khoj
Your Notion content will be automatically synced in the background. You don’t need to manually trigger syncing.
Self-Hosted Setup
If you’re running a self-hosted instance of Khoj, you’ll need to create a Notion integration manually.Create Notion Integration
Go to notion.so/my-integrations and click “New integration”
Configure Integration
- Give your integration a name (e.g., “Khoj”)
- Select the workspace you want to connect
- Click “Submit” to create the integration
Copy API Key
After creating the integration, copy the “Internal Integration Token” - this is your API key
Share Pages with Integration
For each page or database you want to index:
- Open the page in Notion
- Click the ”…” menu in the top right
- Select “Add connections”
- Find and select your Khoj integration
Add API Key to Khoj
In your Khoj settings (default: localhost:42110/settings#notion):
- Paste the API key from Step 3
- Click “Save”
Index Your Content
Click “Configure” in localhost:42110/settings to start indexing your Notion workspace(s)
What Gets Indexed
Khoj indexes the following content types from Notion:Supported Content
Text Blocks
Paragraphs, headings, quotes, and callouts
Lists
Bulleted lists, numbered lists, and to-do items
Toggles
Toggle blocks and their nested content
Links
Hyperlinks and linked content
Page Properties
Page titles and metadata
Nested Content
Child pages and nested blocks
Not Currently Indexed
The following Notion content types are not yet supported:- Databases (tables, boards, galleries)
- Embedded files and attachments
- Images and media
- Code blocks
- Equations
Text content is extracted from complex block types when possible. For example, text within a callout block will be indexed even though callouts themselves are in the unsupported list.
How Notion Content is Processed
Khoj processes your Notion content in a specific way:- Hierarchical Structure: Headings are used to maintain document structure and context
- Page Titles: Each entry includes the page title for better context
- Chunking: Large pages are split into sections based on headings to fit the model’s token limit (~256 tokens per chunk)
- Nested Children: Content within nested blocks (like toggles and bulleted lists) is preserved with its parent context
Syncing and Updates
Khoj Cloud: Your Notion content syncs automatically in the background. Changes in Notion will be reflected in Khoj within a few hours.Self-Hosted: Click “Configure” in the settings page to manually trigger a sync.
What Happens During Sync
- New pages are added to the index
- Modified pages are updated
- Deleted pages are removed from the index
- Shared pages that you later unshare are automatically removed
Searching Notion Content
Once indexed, you can:- Search across all workspaces: Find information across multiple Notion workspaces if you’ve connected more than one
- Get page references: Search results include links back to the original Notion pages
- Chat with your notes: Ask questions about your Notion content and get answers with proper context
Chat with Khoj
Learn how to have conversations with your Notion content
Privacy and Permissions
Khoj only has access to pages and databases that you explicitly share with the integration. It cannot access your entire Notion workspace unless you choose to share everything.
Security Best Practices
- Only share the pages and databases you need indexed
- Regularly review which pages are shared with the Khoj integration
- Use Notion’s permission system to control what team members can share
- For sensitive data, consider using a self-hosted Khoj instance
Troubleshooting
No content appears after connecting
Check Authorization
Ensure you completed the OAuth flow and granted the necessary permissions (Khoj Cloud)
Some pages are missing
- Verify that those specific pages are shared with your Khoj integration
- Check that the pages aren’t in the unsupported content type list
- For self-hosted: Ensure your API token has access to the workspace containing those pages
Search results seem outdated
- Khoj Cloud: Wait a few hours for the automatic sync to update content
- Self-Hosted: Manually trigger a sync by clicking “Configure” in settings
- Recent changes (within the last few hours) may not appear immediately
Authentication errors (self-hosted)
- Verify your API token is correct and hasn’t been revoked
- Check that the integration still has access to your workspace
- Try regenerating the integration token in Notion and updating it in Khoj
Disconnecting Notion
To remove the Notion integration:Khoj Cloud
- Go to app.khoj.dev/settings
- Find the Notion integration
- Click “Disconnect”
- Your Notion content will be removed from the index
Self-Hosted
- Go to your Khoj settings page
- Remove the Notion API token
- Click “Save”
- Optionally, revoke the integration in Notion settings
Disconnecting Notion will remove all indexed content from Khoj’s search index. This action cannot be undone.