This guide covers advanced native automation topics for power users who want to leverage Patrol’s full capabilities.
Native View Inspection Patrol allows you to inspect the native UI hierarchy, which is useful for debugging and understanding the native view structure.
Getting Native Views import 'package:patrol/patrol.dart' ; patrolTest ( 'inspect native views' , ($) async { await $. pumpWidgetAndSettle ( MyApp ()); // Get all native views final views = await $.platform.mobile. getNativeViews ( null ); for ( var view in views) { print ( 'Class: ${ view . className } ' ); print ( 'Text: ${ view . text } ' ); print ( 'Resource: ${ view . resourceName } ' ); print ( 'Children: ${ view . childCount } ' ); } });
Filtering Native Views // Get specific views by selector final buttons = await $.platform.mobile. getNativeViews ( Selector (className : 'android.widget.Button' ), ); print ( 'Found ${ buttons . length } buttons' ); // Get views with specific text final submitButtons = await $.platform.mobile. getNativeViews ( Selector (text : 'Submit' ), );
Native View Properties The NativeView class provides cross-platform access to view properties:
final view = views.first; // Common properties print ( 'Class name: ${ view . className } ' ); // Widget type print ( 'Text: ${ view . text } ' ); // Visible text print ( 'Content description: ${ view . contentDescription } ' ); // Accessibility label print ( 'Focused: ${ view . focused } ' ); // Has focus? print ( 'Enabled: ${ view . enabled } ' ); // Is enabled? print ( 'Child count: ${ view . childCount } ' ); // Number of children print ( 'Resource name: ${ view . resourceName } ' ); // ID (Android) / identifier (iOS) print ( 'App package: ${ view . applicationPackage } ' ); // Package/bundle ID // Traverse children for ( var child in view.children) { print ( 'Child: ${ child . className } ' ); }
Global Configuration Configure native automation behavior for all tests:
patrol_test/patrol_config.dart
import 'package:patrol/patrol.dart' ; PatrolTesterConfig createPatrolConfig () { return PatrolTesterConfig ( platformConfig : PlatformAutomatorConfig . fromOptions ( // Connection timeout (must be longer than findTimeout) connectionTimeout : const Duration (seconds : 60 ), // Default timeout for finding native elements findTimeout : const Duration (seconds : 20 ), // Keyboard behavior keyboardBehavior : KeyboardBehavior .showAndDismiss, // App identifiers packageName : 'com.example.myapp' , bundleId : 'com.example.MyApp' , // App names (for notification handling) androidAppName : 'My App' , iosAppName : 'My App' , // Custom logger logger : (message) => print ( '[Native] $ message ' ), ), ); }
patrol_test/example_test.dart
import 'patrol_config.dart' ; void main () { patrolTest ( 'test with custom config' , config : createPatrolConfig (), ($) async { // Configuration is applied to this test }, ); }
Per-Test Configuration patrolTest ( 'test with inline config' , config : PatrolTesterConfig ( platformConfig : PlatformAutomatorConfig . fromOptions ( findTimeout : const Duration (seconds : 5 ), // Shorter timeout ), ), ($) async { // This test uses the custom timeout }, );
Keyboard Behavior Options Control keyboard visibility when entering text:
// Show keyboard, enter text, then dismiss (default) KeyboardBehavior .showAndDismiss // Alternative behavior (platform-specific) KeyboardBehavior .alternative
Example usage:
// Override keyboard behavior for specific action await $.platform.mobile. enterText ( Selector (text : 'Email' ), text : '[email protected] ' , keyboardBehavior : KeyboardBehavior .alternative, );
Advanced Selector Techniques Combining Selector Properties // Find enabled button with specific text await $.platform.mobile. tap ( Selector ( text : 'Submit' , enabled : true , className : 'android.widget.Button' , ), ); // Find second instance of a view await $.platform.mobile. tap ( Selector ( text : 'Delete' , instance : 1 , // 0-based index ), );
Text Matching Options // Exact text match Selector (text : 'Submit' ) // Text starts with Selector (textStartsWith : 'Sub' ) // Text contains Selector (textContains : 'mit' ) // Similarly for content description Selector (contentDescriptionContains : 'button' )
AndroidSelector ( // Resource name (ID) resourceName : 'com.example:id/button' , // Class name className : 'android.widget.Button' , // Text properties text : 'Submit' , textStartsWith : 'Sub' , textContains : 'mit' , // Content description (accessibility) contentDescription : 'Submit button' , contentDescriptionStartsWith : 'Submit' , contentDescriptionContains : 'button' , // State isEnabled : true , isFocused : false , // Package applicationPackage : 'com.example.app' , // Instance (when multiple match) instance : 0 , )
IOSSelector ( // Accessibility identifier identifier : 'submitButton' , // Text (label) text : 'Submit' , textStartsWith : 'Sub' , textContains : 'mit' , // Accessibility label accessibilityLabel : 'Submit button' , // Element type elementType : IOSElementType .button, )
WebSelector ( // By visible text text : 'Submit' , // By CSS selector cssOrXpath : 'css=#submit-button' , // By XPath cssOrXpath : 'xpath=//button[@id="submit"]' , // By test ID (data-testid attribute) testId : 'submit-button' , // By placeholder placeholder : 'Enter email' , )
Test Isolation Ensure tests run in a clean environment:
Android Configure clearPackageData in build.gradle.kts:
android/app/build.gradle.kts
android { defaultConfig { testInstrumentationRunner = "pl.leancode.patrol.PatrolJUnitRunner" testInstrumentationRunnerArguments[ "clearPackageData" ] = "true" } }
This clears app data between test runs for full isolation.
iOS Use the --full-isolation flag:
patrol test --full-isolation
Full isolation on iOS is experimental and may be removed in future releases.
Embracing Native Tests Patrol integrates Flutter tests with native testing frameworks, allowing you to leverage the entire native testing ecosystem.
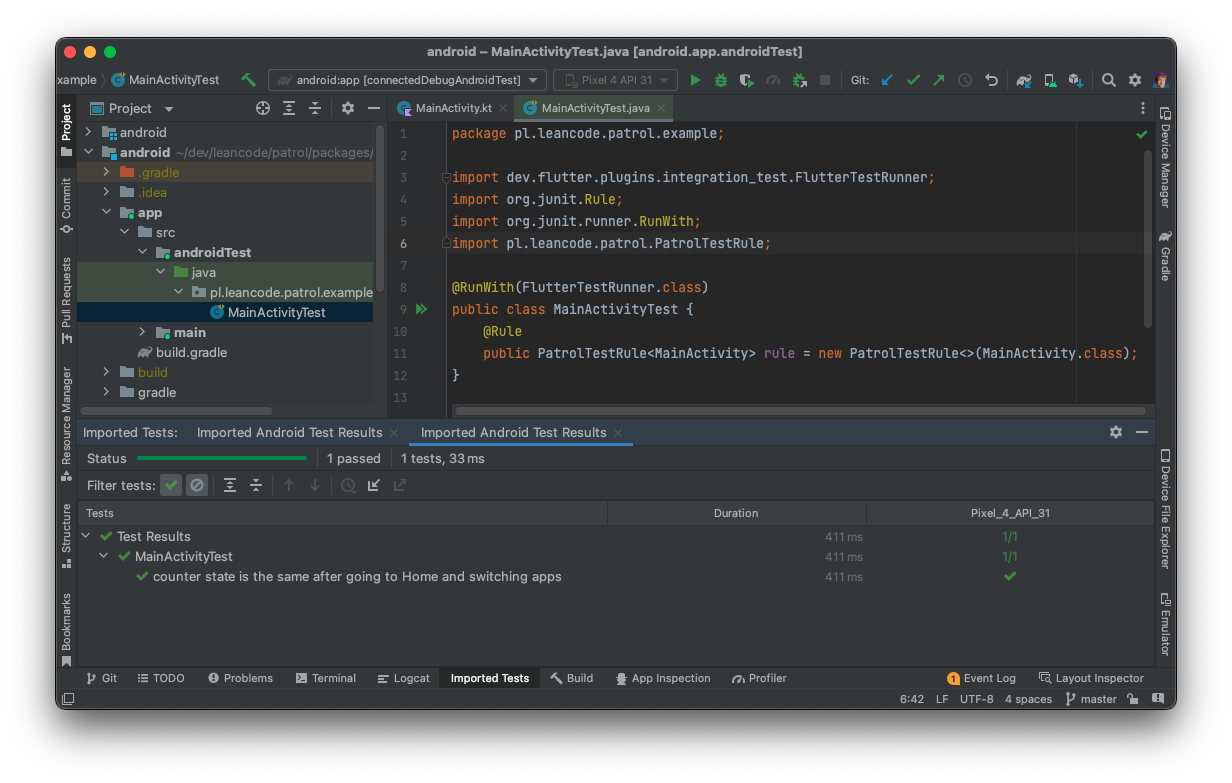
Running Tests from IDE Your Patrol tests appear as native Android instrumentation tests:
Open Android project in Android Studio
Navigate to test file in androidTest/
Right-click and select “Run”
View results in Android Studio test runner
Import test results:
Tests generate results in build/app/outputs/androidTest-results/
Use Run > Import tests from file in Android Studio
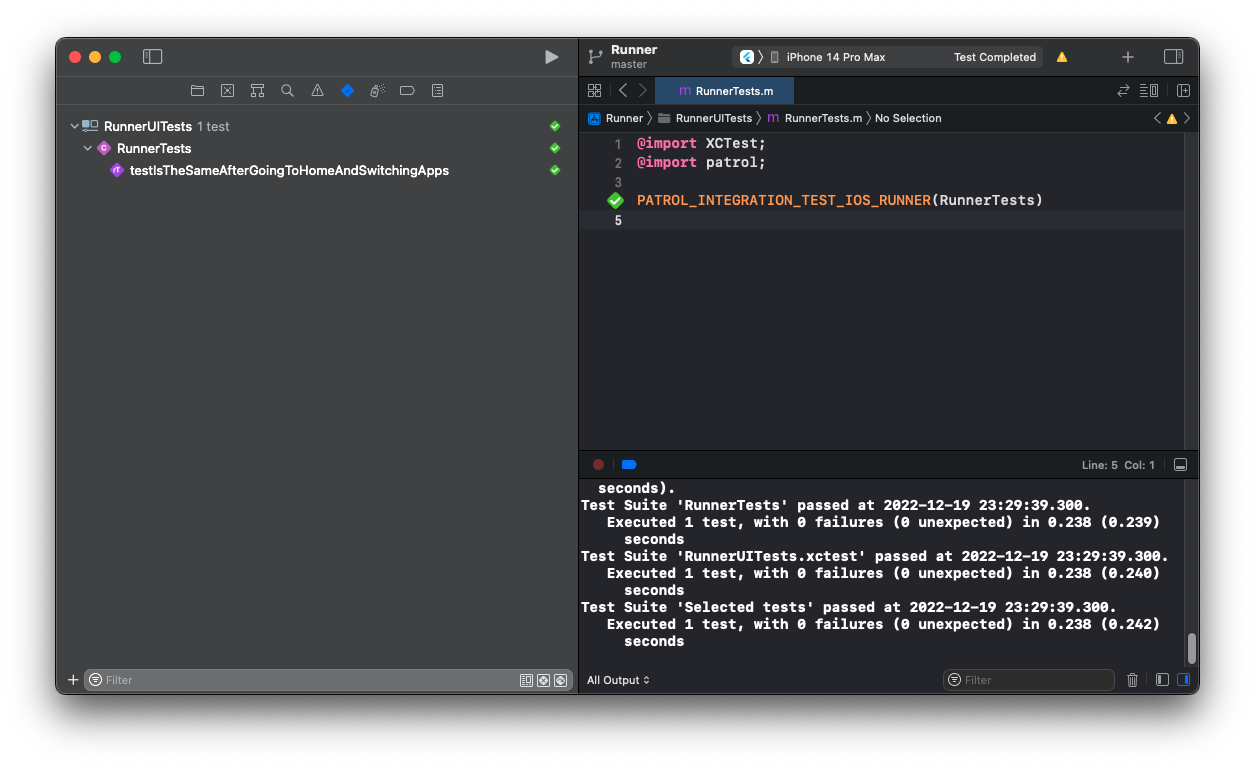
Your Patrol tests appear as native XCTest UI tests:
Open ios/Runner.xcworkspace in Xcode
Select RunnerUITests scheme
Press Cmd+U to run tests
View results in Xcode Test Navigator
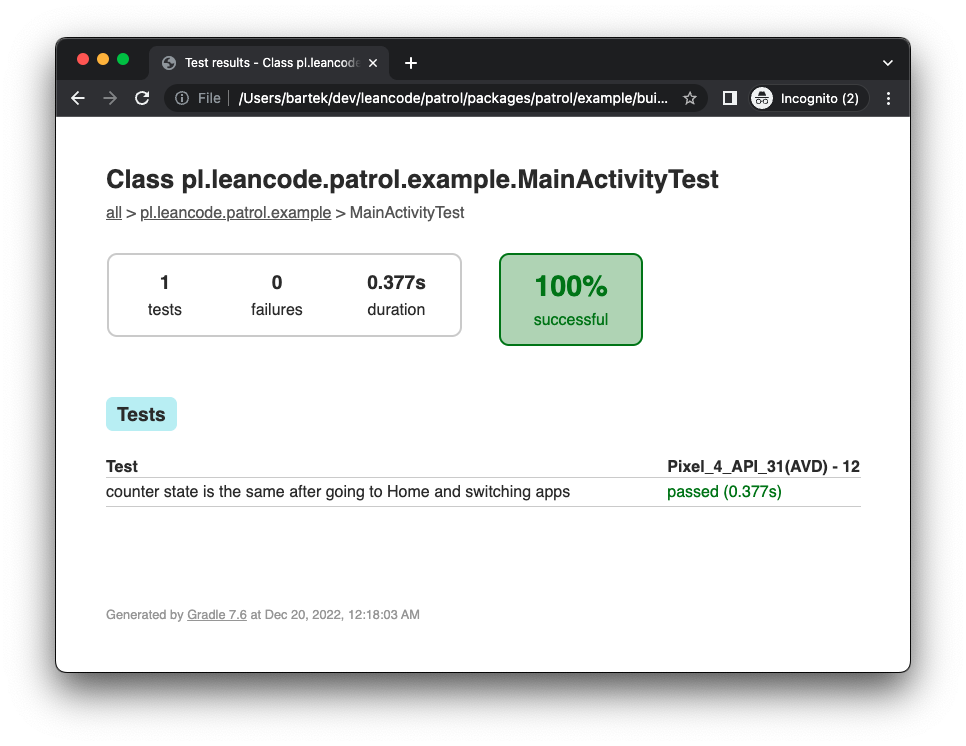
Gradle Test Reports Gradle automatically generates HTML test reports:
# Run tests
patrol test

# Open report
open android/app/build/reports/androidTests/connected/index.html
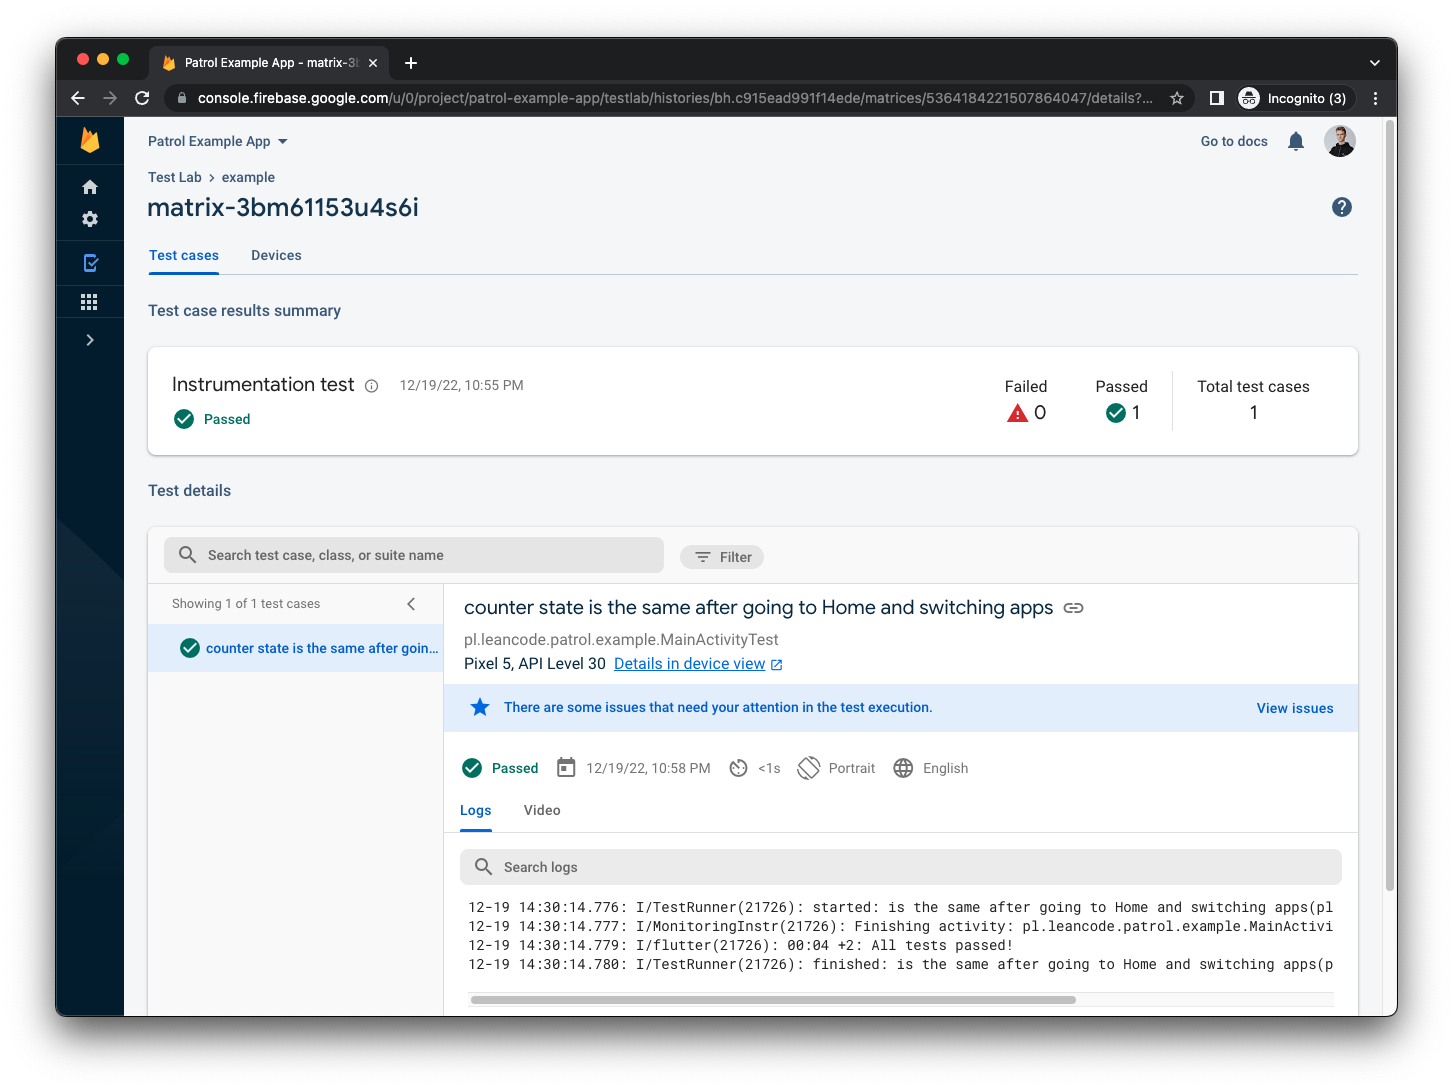
Firebase Test Lab Run Patrol tests on Firebase Test Lab:
# Build APK
patrol build android --target patrol_test/app_test.dart

# Upload to Firebase Test Lab
gcloud firebase test android run \
  --type instrumentation \
  --app build/app/outputs/apk/debug/app-debug.apk \
  --test build/app/outputs/apk/androidTest/debug/app-debug-androidTest.apk
CI/CD Integration Patrol tests work with standard CI/CD tools:
.github/workflows/test.yml
name : Patrol Tests on : [ push , pull_request ] jobs : test : runs-on : macos-latest steps : - uses : actions/checkout@v3 - uses : subosito/flutter-action@v2 with : flutter-version : '3.24.0' - name : Install Patrol CLI run : flutter pub global activate patrol_cli - name : Run tests run : patrol test
test : image : cirrusci/flutter:stable before_script : - flutter pub global activate patrol_cli - export PATH="$PATH:$HOME/.pub-cache/bin" script : - patrol test
Add these steps to your Bitrise workflow:
Flutter Install Script step:
flutter pub global activate patrol_cli export PATH = " $PATH : $HOME /.pub-cache/bin"
Script step:
Specific Version of Patrol CLI Pin Patrol CLI version for CI stability:
# Install specific version
flutter pub global activate patrol_cli 3.0.0

# Install latest in version range
flutter pub global activate patrol_cli ^3.0.0
Timeouts and Waiting Element Timeouts Most methods accept a timeout parameter:
// Custom timeout for this action await $.platform.mobile. tap ( Selector (text : 'Submit' ), timeout : Duration (seconds : 30 ), ); // Wait for element to appear await $.platform.mobile. waitUntilVisible ( Selector (text : 'Loading complete' ), timeout : Duration (seconds : 60 ), );
Connection Timeout Set in config (must be longer than findTimeout):
PlatformAutomatorConfig . fromOptions ( connectionTimeout : Duration (seconds : 60 ), findTimeout : Duration (seconds : 20 ), )
Debugging Tips Enable Native Logging PlatformAutomatorConfig . fromOptions ( logger : (message) { print ( '[NATIVE] $ message ' ); }, )
Inspect UI Hierarchy // Dump entire native UI tree final views = await $.platform.mobile. getNativeViews ( null ); void printViewTree ( NativeView view, int depth) { final indent = ' ' * depth; print ( ' $ indent ${ view . className } : " ${ view . text } "' ); for ( var child in view.children) { printViewTree (child, depth + 1 ); } } for ( var root in views) { printViewTree (root, 0 ); }
Take Screenshots // After native action await $.platform.mobile. tap ( Selector (text : 'Submit' )); await $. takeScreenshot ( 'after-submit' );
Increase Swipe Steps If swipes don’t work, increase steps for slower motion:
// Fast swipe (may not work) await $.platform.mobile. swipe ( from : Offset ( 0.5 , 0.8 ), to : Offset ( 0.5 , 0.2 ), steps : 12 , ); // Slower, more reliable swipe await $.platform.mobile. swipe ( from : Offset ( 0.5 , 0.8 ), to : Offset ( 0.5 , 0.2 ), steps : 50 , );
Best Practices // Good: Works on both platforms await $.platform.mobile. pressHome (); // Avoid: Platform-specific unless necessary if ( Platform .isAndroid) { await $.platform.android. pressBack (); }
2. Check for Dialogs Before Handling // Good: Check first if ( await $.platform.mobile. isPermissionDialogVisible ()) { await $.platform.mobile. grantPermissionWhenInUse (); } // Bad: May fail if dialog doesn't appear await $.platform.mobile. grantPermissionWhenInUse ();
3. Use Appropriate Timeouts // Good: Longer timeout for slow operations await $.platform.mobile. tap ( Selector (text : 'Load Data' ), timeout : Duration (seconds : 30 ), ); // Bad: Default timeout may be too short await $.platform.mobile. tap ( Selector (text : 'Load Data' ));
4. Clean Up Test State patrolTest ( 'test' , ($) async { // Test code... // Clean up await $.platform.mobile. closeNotifications (); await $.platform.mobile. disableDarkMode (); await $.platform.mobile. enableWifi (); });
5. Use Descriptive Selectors // Good: Specific and readable await $.platform.mobile. tap ( Selector ( text : 'Submit Order' , contentDescription : 'Submit button' , ), ); // Bad: Fragile await $.platform.mobile. tapAt ( Offset ( 0.5 , 0.8 ));
Next Steps
Feature Parity See detailed feature availability across platforms
CI/CD Setup Configure Patrol for continuous integration