Overview
Step 3 is the longest step in the setup process. It configures, compiles, and installs all the third-party libraries that Miele-LXIV depends on. The build process is fully automated but takes approximately one hour to complete.Build Time: Approximately 1 hour on modern hardware. The exact time depends on your CPU and number of cores.
What Gets Built
The build process compiles and installs each library in the correct dependency order:- libiconv - Character encoding conversion
- OpenSSL - Cryptography library
- libpng - PNG image support
- zlib - Compression library
- libxml2 - XML parsing
- libjpeg - JPEG image support
- libtiff - TIFF image support
- VTK - Visualization Toolkit (collapsed into single library)
- ITK - Insight Toolkit (collapsed into single library)
- DCMTK - DICOM Toolkit (collapsed into single library)
- OpenJPEG - JPEG 2000 support
- Jasper - Additional image format support
- GLEW - OpenGL extensions (optional)
- GLM - OpenGL mathematics (optional)
Running the Build
Enable Configure, Build, and Install
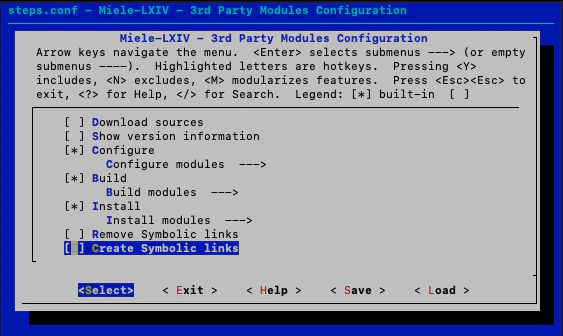
In the kconfig-mconf interface:
- Disable “Download sources” (if it’s enabled - you’ve already downloaded everything)
- Enable “Configure” - prepares build configurations
- Enable “Build” - compiles the libraries
-
Enable “Install” - installs to your BIN directory
Build Process Details
Configuration Phase
For each library, the build system:- Runs CMake or configure scripts with appropriate flags
- Sets up compiler options for macOS compatibility
- Configures library dependencies
- Specifies installation paths
Build Phase
Libraries are compiled using:- Parallel compilation (
-jflag using all CPU cores) - Release configuration
- Static linking where appropriate
- macOS deployment target settings
Install Phase
Compiled libraries are installed to your configuredBIN directory:
Monitoring Progress
The build script outputs detailed progress information:The “collapse” steps combine multiple
.a files into single libraries for VTK, ITK, and DCMTK, making them easier to link in Xcode.Expected Output
You’ll see:- CMake configuration output
- Compiler progress with percentage completion
- Installation confirmations
- Occasional warnings (usually safe to ignore)
Library Collapsing
For the major toolkits (VTK, ITK, DCMTK), the build process creates consolidated libraries:libVTK.a- Single VTK library from all VTK componentslibITK.a- Single ITK library from all ITK componentslibDCMTK.a- Single DCMTK library from all DCMTK components
Disk Space Requirements
During the build:- BLD directory: ~10-15 GB (temporary build files)
- BIN directory: ~3-5 GB (installed libraries)
After the build completes successfully, you can safely delete the
BLD directory to reclaim disk space. The Xcode project only needs the BIN directory.Troubleshooting
Build fails with compiler errors
Build fails with compiler errors
Common causes:
- Xcode Command Line Tools not installed or outdated
- Missing dependencies
- Incompatible macOS version
Build runs out of disk space
Build runs out of disk space
The build process requires significant temporary space. Free up disk space and restart from the failed library by:
- Running
./reconfigure.sh - Disabling already-built libraries in the Build menu
- Running
./build.shagain
OpenSSL build errors about EVP_PKEY_get_bits
OpenSSL build errors about EVP_PKEY_get_bits
This can happen with conflicting OpenSSL versions from Homebrew. The build script includes commented-out commands to temporarily unlink OpenSSL 3 and use OpenSSL 1.1:Edit
build.sh around line 577-582 and uncomment the brew link/unlink commands.Build is taking too long
Build is taking too long
On older hardware, the build can take 2+ hours. The main time consumers are:
- VTK: 20-30 minutes
- ITK: 20-30 minutes
- DCMTK: 10-15 minutes
Verifying Success
Check that libraries were installed:Reclaiming Disk Space
After successful build and install:Next Step
Step 4: Create Symbolic Links
With all libraries compiled and installed, create symbolic links to make them accessible to the Xcode project.