Saving versus publishing
Saving happens automatically. Mintlify stores your edits on its servers and persists them across browser tabs, devices, and network interruptions. Publishing commits your changes to your Git repository. Click Publish in the toolbar to open the publish menu, save your changes as a Git commit, and create a pull request. The editor tracks the following as pending changes:- Content edits in pages
- New or deleted pages
- Navigation structure changes
- Media uploads
- Configuration updates
What happens when you publish
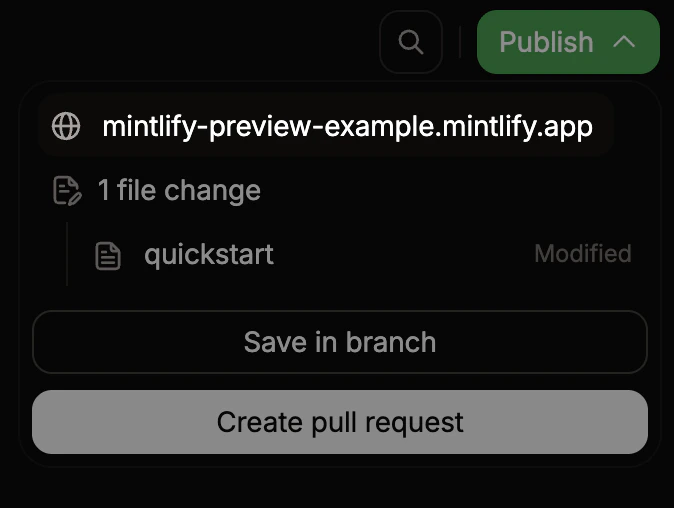
The actions available when you click the publish button depend on your current branch and whether it has branch protection rules that require pull requests.- Publish: Commits and deploys your changes to your live site immediately.
- Save in branch: Commits your changes to the feature branch without merging to your deployment branch.
- Create branch: Moves your pending changes to a new feature branch when you’re on a protected deployment branch.
- Create pull request: Opens a pull request targeting your deployment branch.
Your live site updates after Mintlify builds and deploys your changes. This typically takes 30 seconds to a few minutes. Check the deployment status on your dashboard.
When to use a branch
Edit directly on your deployment branch if you do not use a Git-based workflow. Create a branch when you use a branch-based workflow where you make each change to your content on a separate branch.Create and switch branches
Create a branch
- Click the branch name in the editor toolbar.
- Click Create new branch.
- If you have pending changes, choose whether to bring them to the new branch or leave them on the current branch.
- Enter a name and click Create branch.
Switch branches
- Click the branch name in the toolbar.
- Search for or scroll to the branch you want.
- Click the branch to switch to it.
Switching branches while you have unpublished changes prompts you to bring those changes to the new branch or leave them behind. Changes left behind remain on your original branch.
Preview your changes
Every time you save changes to a feature branch, Mintlify builds a preview deployment, a temporary URL where your changes render exactly as they look when published.Access and share a preview
- Click Publish in the editor toolbar.
-
In the publish menu, click the preview URL. The URL format is
organization-branch-name.mintlify.site.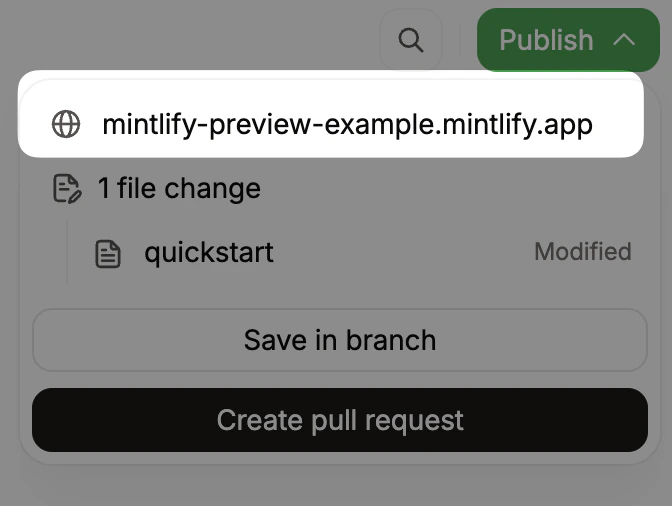
Restrict access to previews
Preview URLs are publicly accessible by default. To restrict access to members of your Mintlify organization, enable preview authentication in the Add-ons page of your dashboard.Share editor links
To invite a teammate to a specific page on a branch, copy the URL from your browser’s address bar and share it. Anyone with access to your Mintlify organization can open the link directly in their editor session. The URL format is:https://app.mintlify.com/acme/docs/editor/main/~/guides/quickstart.mdx
Review and merge pull requests
When a pull request is open for the current branch, the publish menu shows a review panel with:- The pull request title, description, and whether it is a draft.
- The source and target branches.
- The number of changed files.
- The approval requirement on the deployment branch: Approval required, Code owner required, or no requirement.
- The current review status: Approved, Changes requested, or Awaiting review.
Approve pull requests from the editor
For GitHub repositories, reviewers can approve open pull requests in the editor. When a pull request is open, an Approve pull request button appears in the review panel if your account has permission to review it. Click Approve pull request when the changes are ready to merge. The review status updates to Approved and the Merge and publish action becomes available. The approve action is not available for draft pull requests, pull requests you have already approved, or GitLab merge requests. Click Open in GitLab to approve a merge request in GitLab.Review changes before merging
Click any changed file in the publish menu to open it in diff view and compare your branch against the published version. In visual mode you see a visual diff. In source mode you see a text diff. Files that can’t display a diff, such as images or deleted files, appear in the list but aren’t clickable. The file tree highlights changed pages so you can see at a glance which files an automation or teammate touched. Unlisted pages that appear in the branch diff are also openable from the publish menu, even though they don’t appear in your site navigation.Open an automation run in the editor
When an automation opens a pull request, you can jump straight from the run review UI or its Slack notification into the editor on the automation’s branch:- From the Automation Runs page in your dashboard, click Open in editor on a completed run.
- From a Slack notification, click the View changes link.
Simultaneous publishing
Only one publish can happen at a time per branch. If another team member publishes to the same branch, wait for the current publish to complete before trying again.Pull request titles and descriptions
If your organization requires pull requests, you can enter a title and description when you publish. If you leave either blank, the editor uses a default message that lists the files you created, updated, moved, or deleted.Resolve conflicts
Conflicts occur when your branch and the deployment branch have incompatible changes to the same files. For example, when you and a teammate edited the same lines in a file or moved a file to different locations. The editor displays a warning when conflicts block publishing. Follow the prompts to choose which version of each conflicting section to keep.Collaborate in real time
When multiple people open the same page on the same branch, they edit together in real time. Each person’s cursor and edits are visible to everyone, with avatars shown in the toolbar.- Changes from all collaborators merge automatically. Two people editing the same section won’t create conflicts.
- Undo only affects your own edits.
- If you lose your connection, edits save locally and sync when you reconnect.